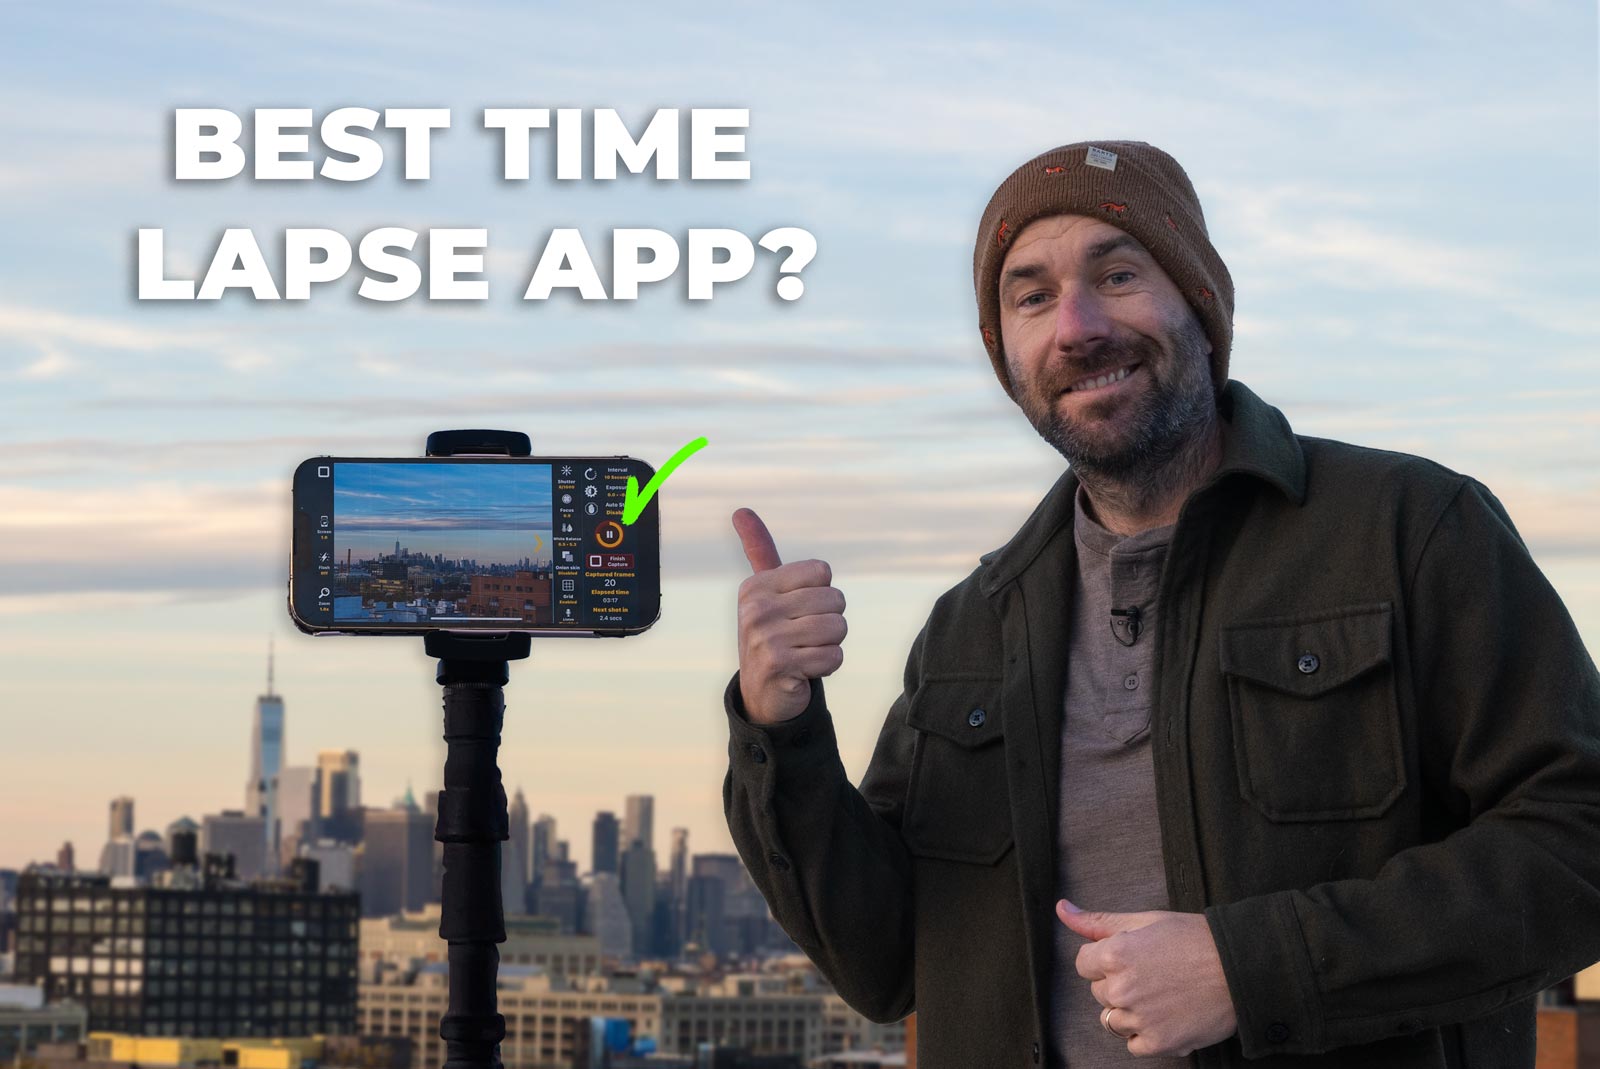
Lapse It is an award-winning full-featured app for IOS and Android-powered devices to allow your smartphone, or tablet to take professional quality time lapses and stop motion videos straight from the comfort of your hand.
Lapse it comes in two versions, a free version, and paid. The paid option is $2.99.
If you want to level up your time lapse and hyperlapse game so you can charge more money and save hours of headaches and frustration. I have made a course for you that over 400 students have enrolled in!
I’m confident Hyperflow Masterclass will get you from zero to shooting like a pro or I’ll give you your money back!
Check out the course here to see if it’s right for you.
How to Use Lapse It Timelapse App – Everything You Need to Know
This blog post is aimed at helping you get the most out of the intuitive and powerful Lapse It app on your IOS or Android device. Note this is a FREE app that does allow in-app purchases for more professional settings which will be talked about.
The main thing the paid version gives you is the ability to shoot in raw, up to the full resolution of your smartphone, and download the images. To me this is great because I like having the ability to edit them later on in my computer if I shot something and want the best quality out of it.
This is my favorite app for shooting time lapses on any smartphone. My only complaint about it would be that the user interface is complicated for no real reason. There is just too much going in on the screen. But it’s still the only app I have found that allows me to download the RAW images to edit elsewhere.
Lapse it Download

You can download Lapse It for free on IOS devices here and Android devices here.
Lapse It Settings

This time lapse app is one of my favorites and the reason for that is how powerful and robust this app is. It makes taking professional-looking time lapses a breeze and does two things that I absolutely love.
Takes photos in RAW, and allows me to use the camera’s full Sensor. However, those two features are PAID features.
This means you need to pay $2.99 per year to access those features.
I’m going to go through each setting as you would see them on an IOS device. But they should all be in similar layouts when you use the app on Android.
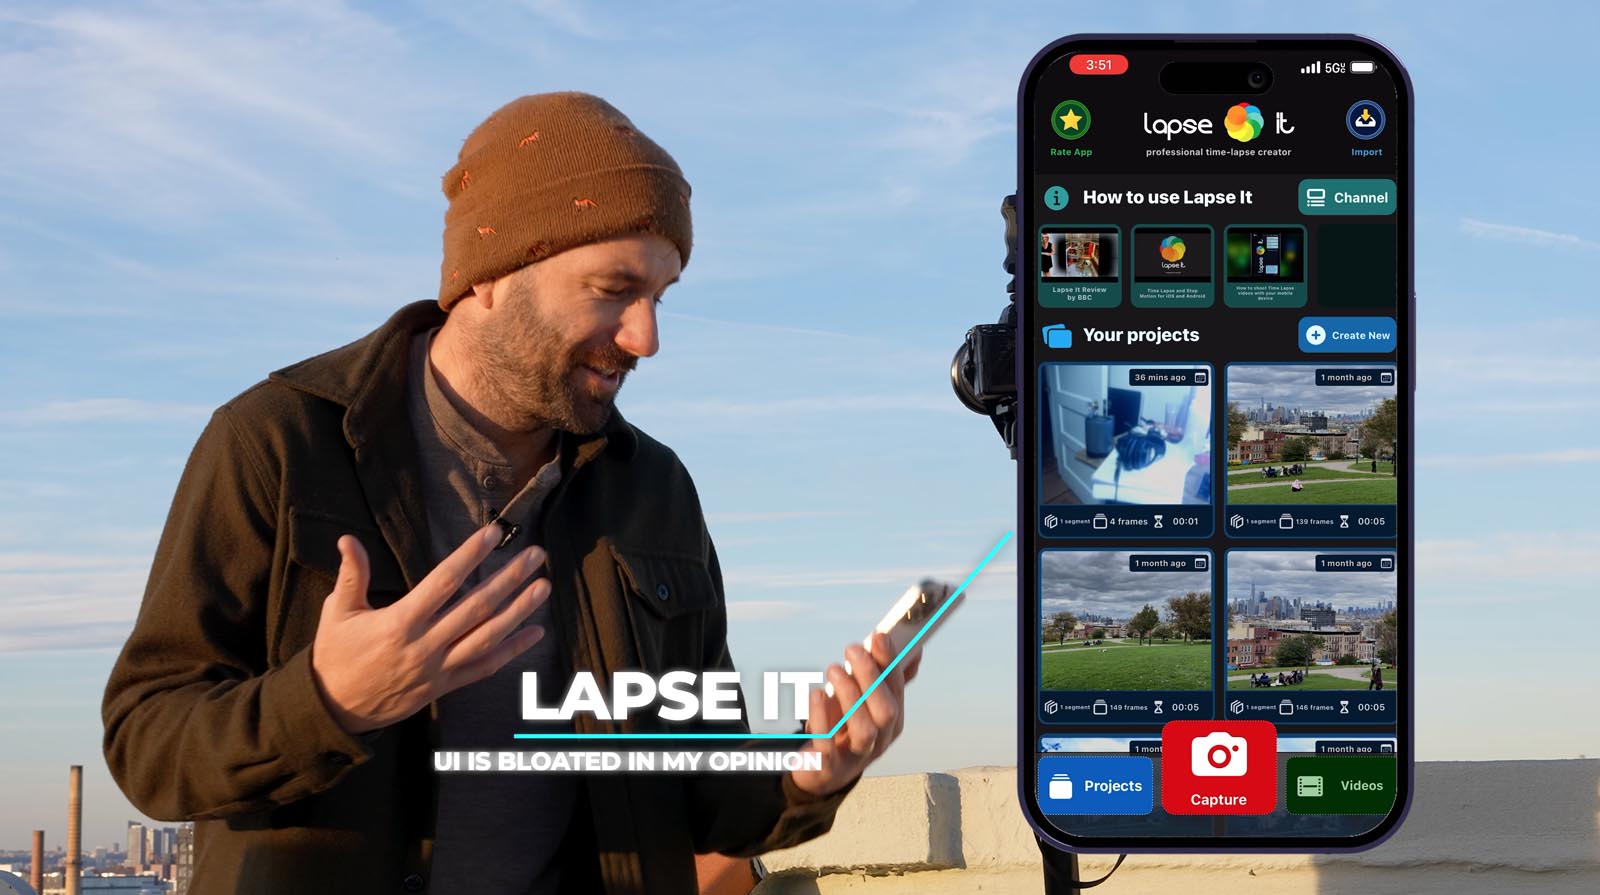
When you first launch the app there is quite a bit of things on the screen. Its user interface isn’t the best but it’s still pretty easy to use.
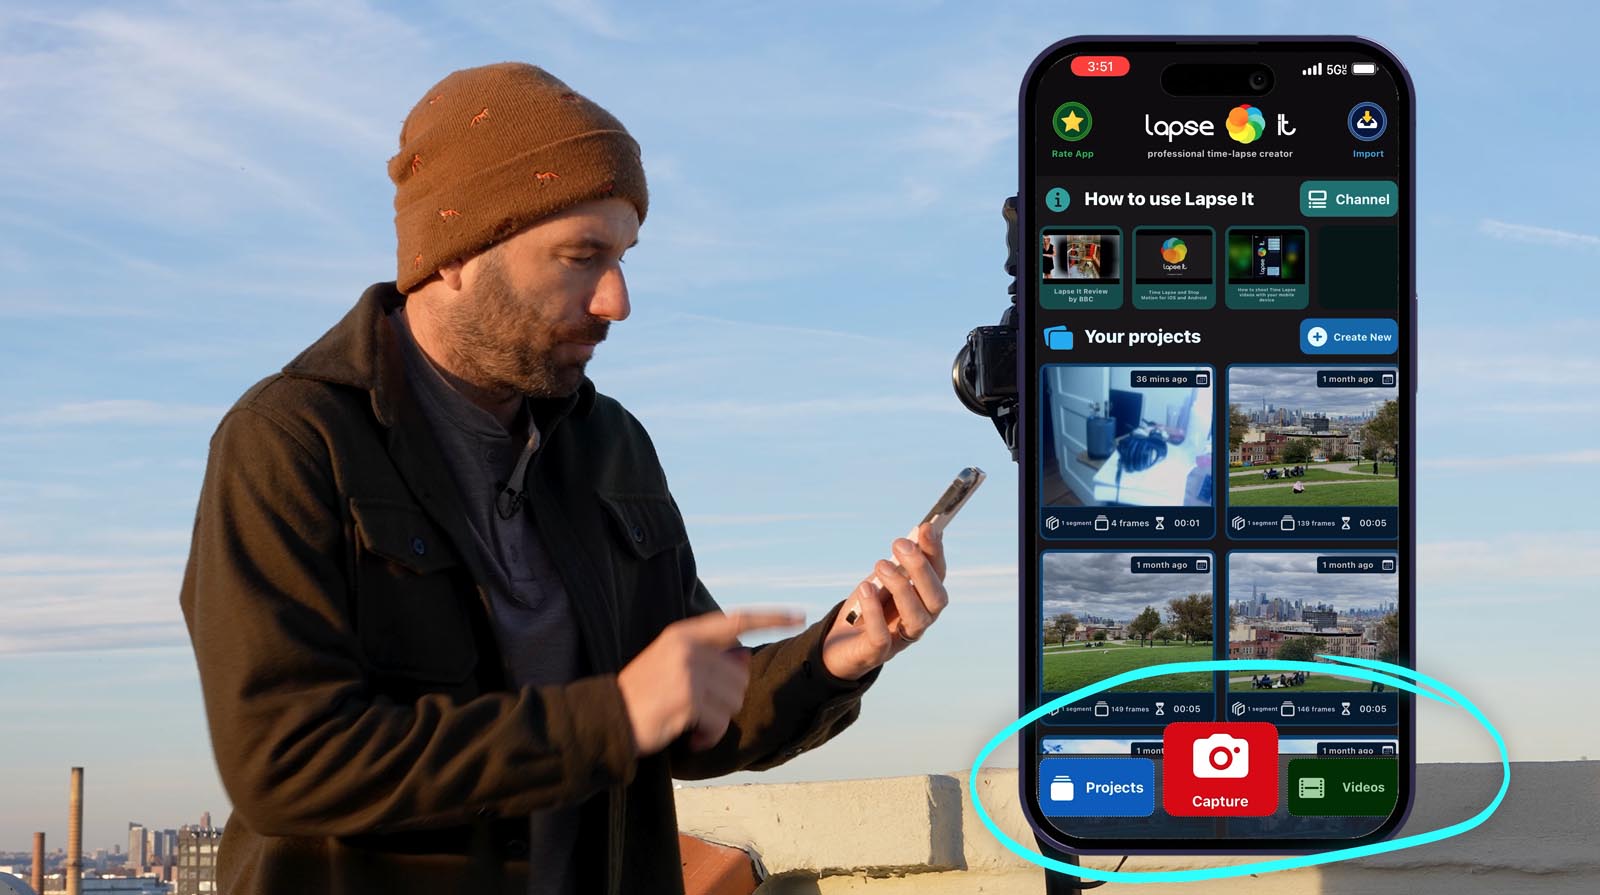
On the dashboard, you’ll get info like how to use it, your projects, and the ability to capture, import, and edit current projects. As shown above.
To begin shooting your time lapse, press capture. Once you press capture it will prompt you to your camera and you’ll see the following screen with A LOT more functionality.
INTERVAL
Starting on the top right you will see a word called INTERVAL. This is perhaps the most important thing you need to know.
Interval is a word that means how often the camera will take a photo. Lapse it will give us between milliseconds, I recommend anywhere between 1-10 seconds depending on what you are shooting. This app will give us

When you press it you get options like an hour, minute, second, or even milliseconds, and even a handy dandy stop-motion setting.
If you are new to intervals or want more details on how to use intervals I have this guide on how to choose the best interval no matter what.
EXPOSURE
The next section you get an exposure setting. This is great for changing the exposure in case you want it brighter or darker.
Auto Stop
Did you know people get bored after just ten seconds? Now that you, never shoot a time lapse more than 10 seconds. You can thank me later.
So this Auto stop is a great feature if you know how long you want your finished time lapse to be.
Let’s say you want it to be 10 seconds. You can go into frames and say I want my video to be 10 seconds, and it will be at 30 frames per second, then I will want my time lapse to stop at 300 frames.
Another option is Duration.
Maybe you only have 10 minutes to shoot a time lapse.
You can just put in 10 minutes (unfortunately it’s only in seconds so you have to dial in 600 seconds.) This is handy.
Capture Button
This is when you are ready to record your time lapse. Simply press the red button to begin or end the time lapse.
Camera

When you click the camera setting you can use any of the camera’s on your device. Camera’s are always changing but you can take full advantage of whatever technology your camera has. For example mine has bakc dual camera, back camera, front camera, and back telephoto camera.
I love using the telephoto camera.
Resolution
This is where you can change the settings of your resolution. Since I do it for work I love the full resolution and that is what I use.
Preset
This will allow you to create a preset. I never do this, but it’s an option available for you.
Schedule
This is the app’s setting for a delay on the camera. Meaning it will have a delay from the moment you press the capture button by the number of seconds you choose. I recommend 3-5 seconds so you don’t introduce shake.
HDR

HDR stands for High Dynamic Range and allows users the ability to take 3 photos each time and it automagically blends them into an HDR photo. bracketed exposure and turn it into a time lapse.
Location Enabled
A shortcut to turn on or off the device’s location recording settings. Personally, I love having this on in case I want to see where I was later.
RAW
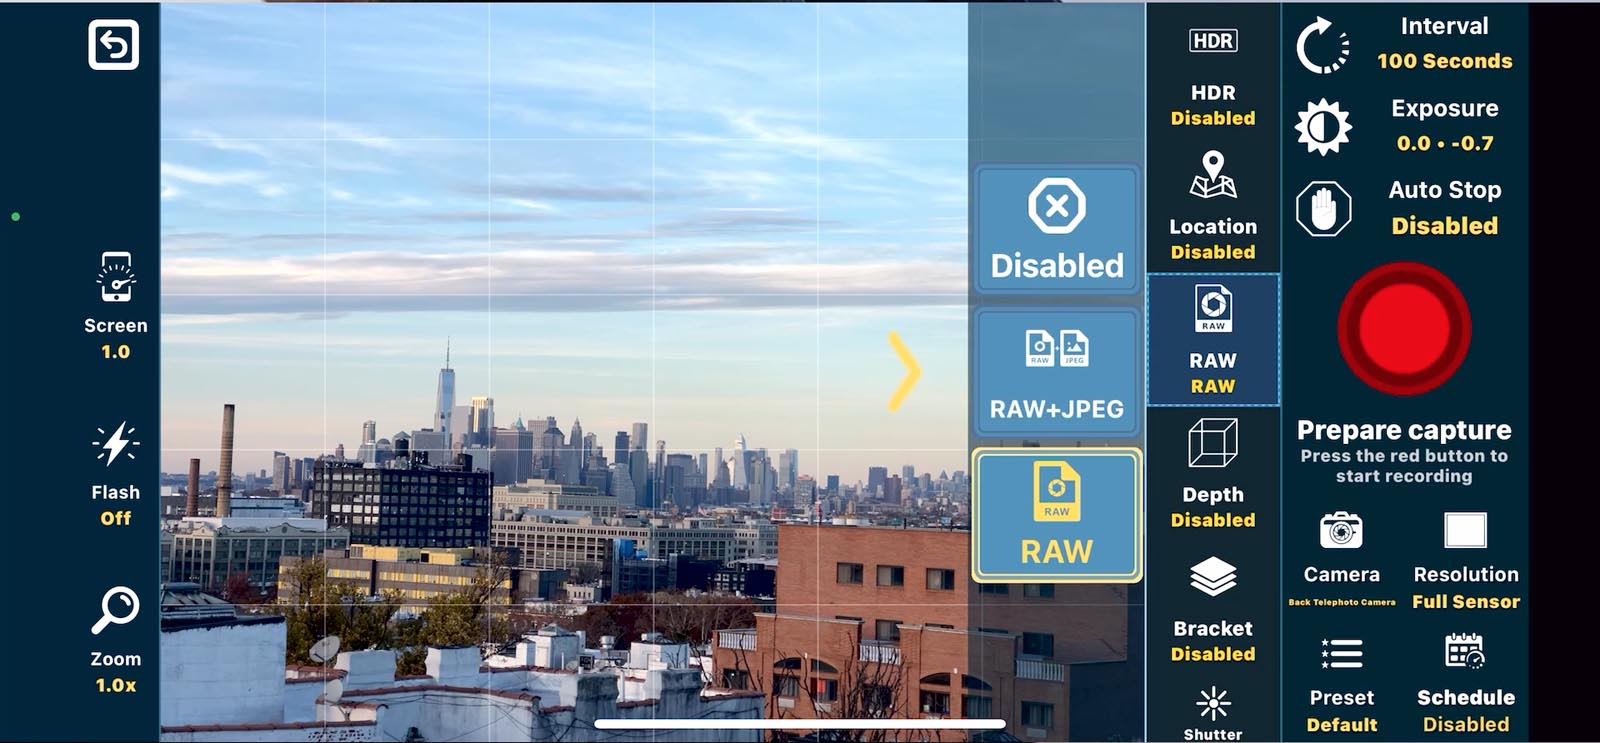
This is a PRO feature that allows your device to take photos in RAW. RAW is an unedited lossless version of the photo that allows you to edit it in other software like Lightroom, After Effects, and LRTimelapse. A must-have for a professional workflow.
Depth
Another advanced feature that you can use is creating a depth map. If you have something you want in focus and something you don’t want. You’d use this to help your camera create depth. This is more a stop motion tool than a time lapse tool as in time lapse you want everything in focus.
Bracket

This is just like HDR except it won’t automatically blend them into another image. This is really advanced and a cool feature if that is a workflow you are familiar with.
Shutter
Have full control over your camera’s shutter. This is cool but advanced. I think in most situations it might overcomplicate your time lapse.
Focus
I recommend treating this like a set it and forget it button.
A common time lapse problem is having continuous autofocus. This is bad because the camera might change its focus between each shot.
Which creates weird pulses that are VERY distracting.
I recommend just turning this to fixed and never thinking about it again.
White balance

Here you can change your camera’s white balance. Like focus, I recommend changing it to FIXED. This will keep your white balance consistent and not have weird and distracting jumps introducing flicker into the time lapse.
Low Light
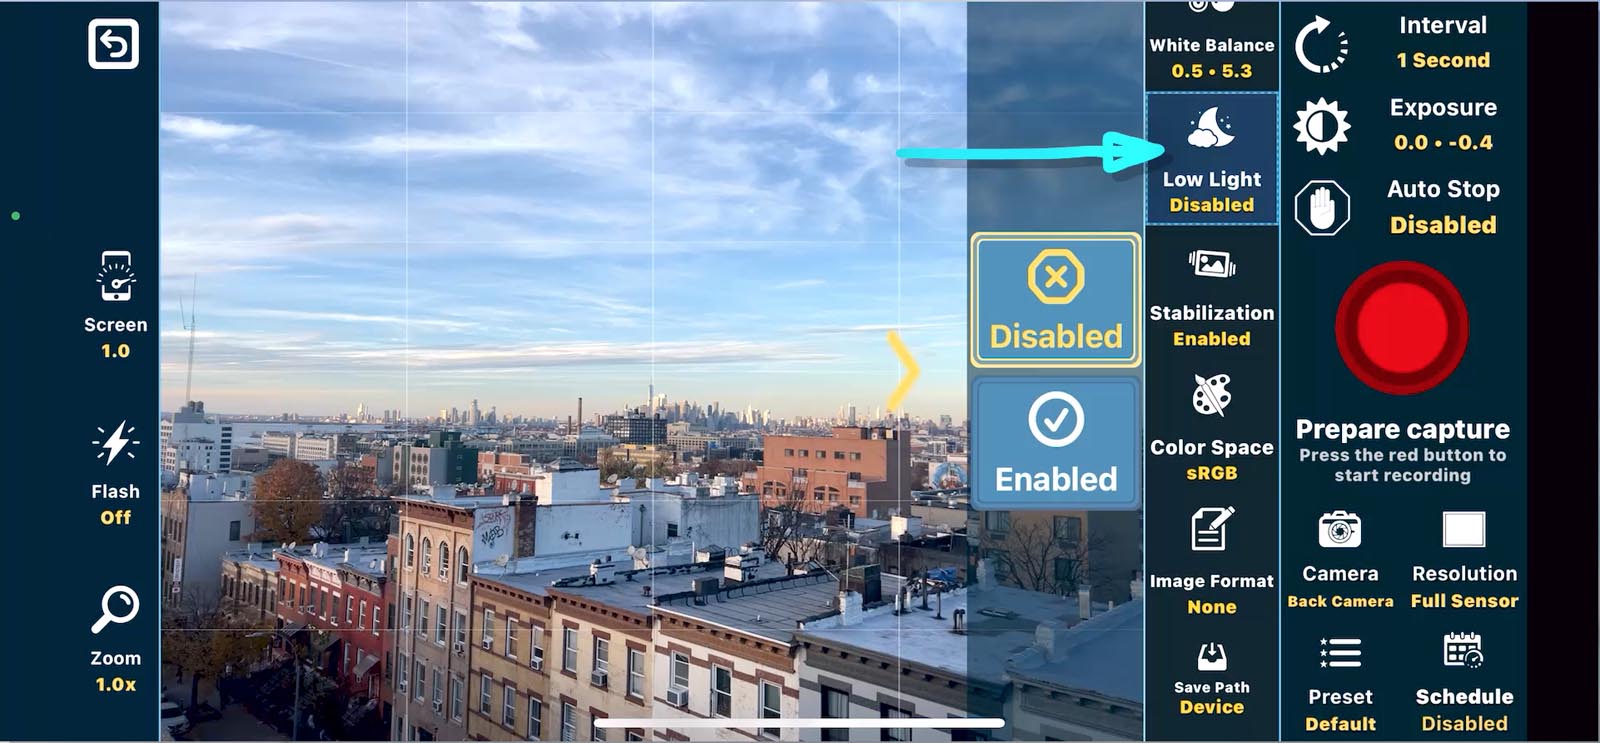
Here you can enable low light settings on your time lapses, very useful in dark settings but typically overkill.
Stabilization
Here you can adjust if your camera has stabilization, this is a handy feature if it’s windy, or if you are going hand-held doing a hyperlapse.
Color Space

This allows you to change from the standard color range of sRGB to a newer and more wide array of colors in p3. I don’t recommend this unless you’re going to edit the footage on computers.
Image Format
Here you get two options. RAW, or JPEG. These are photography terms for the image. JPEG is a compressed pre edited photo that is much smaller in size. RAW is for editing the photos later. Better color control but larger file size.
Save Path

Save path refers to where your camera will save the time lapse video when done. Either save them to the Cloud, or your smartphone.
Android users can customize this even further. IOS users it will save to the camera roll.
Onion Skin
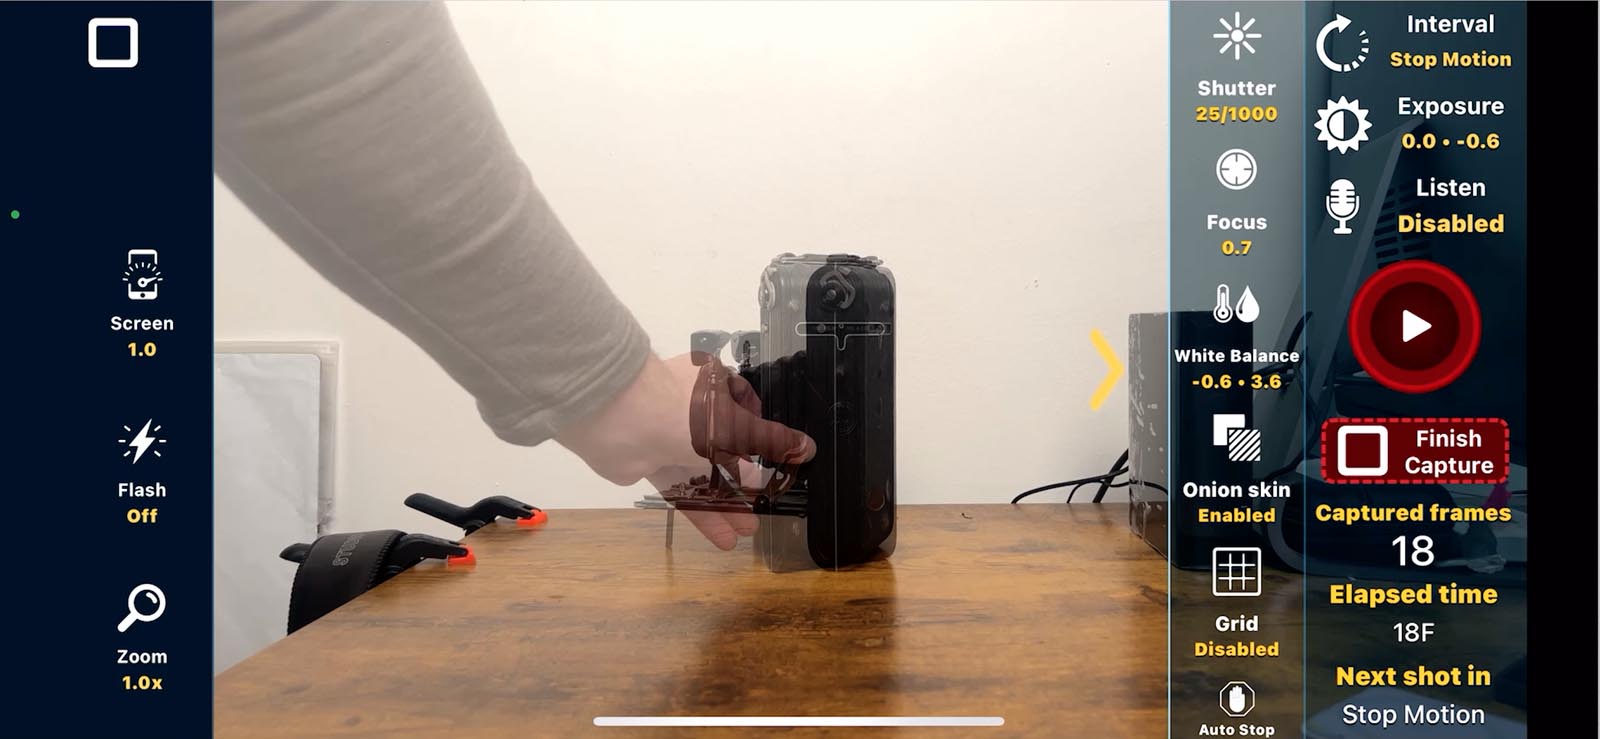
Onion Skin is a stop motion feature that enables you to see an overlay of your previous image so you can make sure your stop motion is looking good.
Grid

Helpful for lining up your photos and making sure the framing is right.
EXPORTING USING Lapse IT
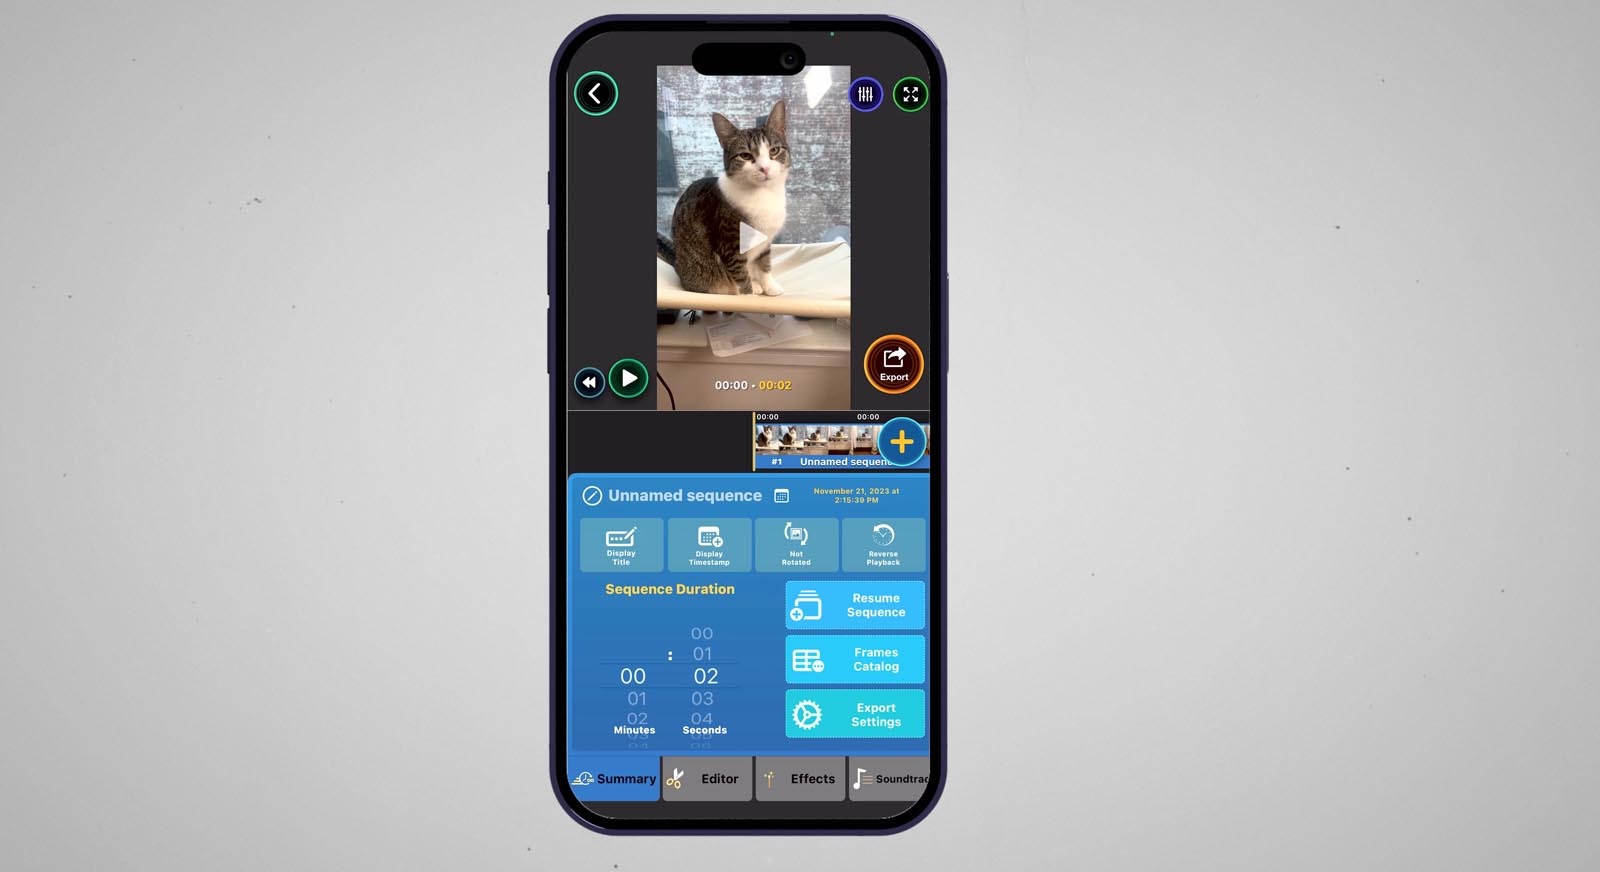
There are two ways to export using Lapse it. You can simply export a finished time lapse video, or a folder with all the raw photos to edit on your computer.
The simplest way is all done on your phone. Once done with your time lapse navigate to your project.
Then click export. Here you will get a pop-up asking where you want to save it, I recommend saving to photos. If you want to edit in CapCut or another program before sharing.
The advanced way will export all the raw photos individually so you can edit in programs like LRTimelapse or After Effects.
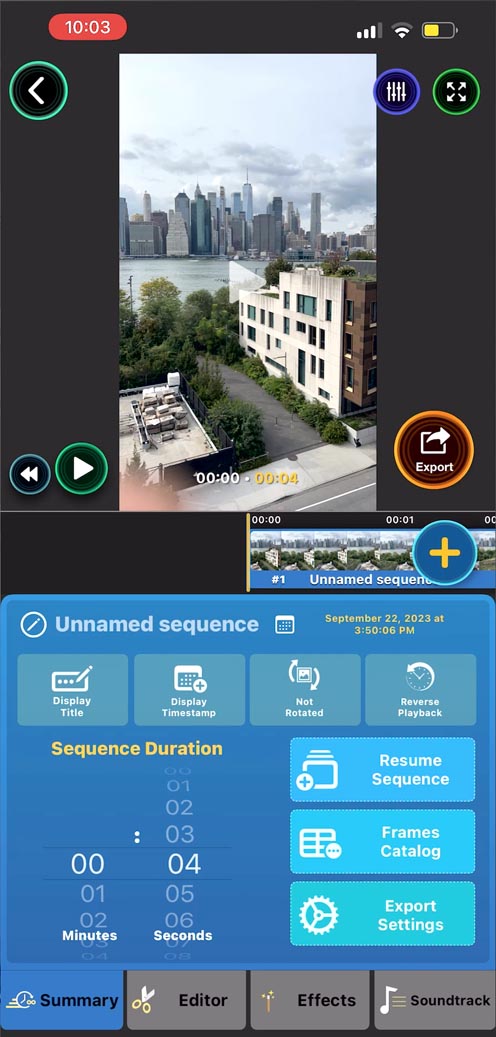
To access this again go to the project you want to export and then when you have it selected select the settings icon feature in the image below.

That will load up a project preferences panel and I like to have it as follows.
Output same as the first. This way it will always be the highest quality resolution. I recommend a 30 output frame rate, quality at extreme, and output format as MOV. These are the optimal settings available.

Once that is done x out and navigate to where the FRAMES calotog is. Blue button in the middle.

Follow the instructions asking you to tap that and then the select all button, confirm, and export as zip.

From here you can airdrop them to your computer for further editing, or transfer them to the cloud and download them.
Related – Learn how to edit a time lapse using LRTimelapse here.
FINAL THOUGHTS
While I believe this is the absolute best time lapse app for Android or IOS because it has so many features. Its user interface is its only drawback. A lot of buttons and features are unnecessary and not clear creating a learning curve.
But it is really simple and easy to use when you get the hang of it. And does allow for some advanced features that cover for its clunkiness.
CONCLUSION
This app is for those looking happy with a free-to-use time lapse app. Those who don’t need all the bells and whistles.
The $2.99 version is great for those seeking professional quality time lapses on the fly without needing a DSLR.
WATCH HOW TO USE LAPSE IT HERE