Hello time-lapse enthusiast. In this post, I am going to provide what has become the SIMPLEST and Easiest way to shoot and edit a holy grail time lapse.
As well as a bonus tip at the end of this post that will give you a powerful tip to plan your holy grail time lapse.
Shooting a holy grail timelapse used to be one of the most difficult things in the world of time-lapse and hyper-lapse.
It used to require extra things hanging from your camera, but also understanding dozens of different settings. Not to mention hours editing and assembling the final timelapse.
Luckily for us today, camera technology has caught up and it’s made shooting and editing a holy grail timelapse almost as simple as any ordinary timelapse.
If you want to level up your time lapse and hyperlapse game so you can charge more money and save hours of headaches and frustration. I have made a course for you that over 400 students have enrolled in!
I’m confident Hyperflow Masterclass will get you from zero to shooting like a pro or I’ll give you your money back!
Check out the course here to see if it’s right for you.
Easiest Tips for Shooting Holy Grail Timelapse
A quick caveat, this is mostly going to apply to shooting a holy grail timelapse on your DSLR, but the same idea applies to using your smartphone.
What is a Holy Grail Timelapse
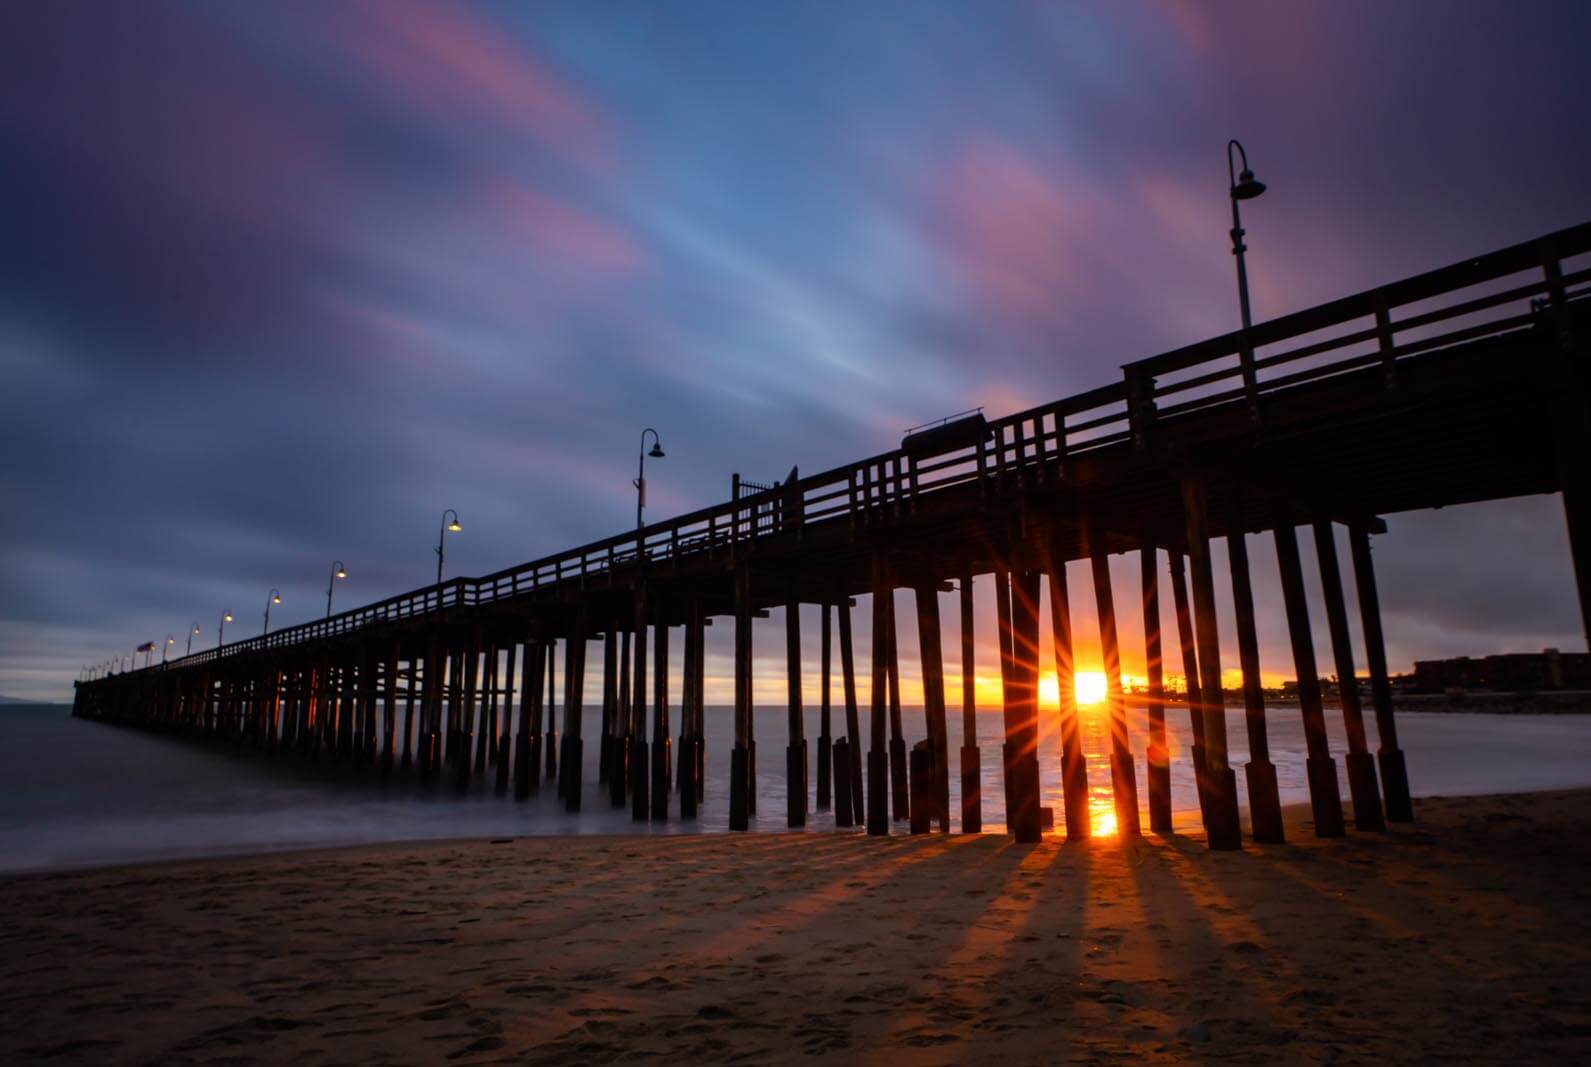
A “holy grail timelapse” gets its name because of just how insanely difficult it was to make. But basically, it’s a day-to-night timelapse or a night-to-day timelapse.
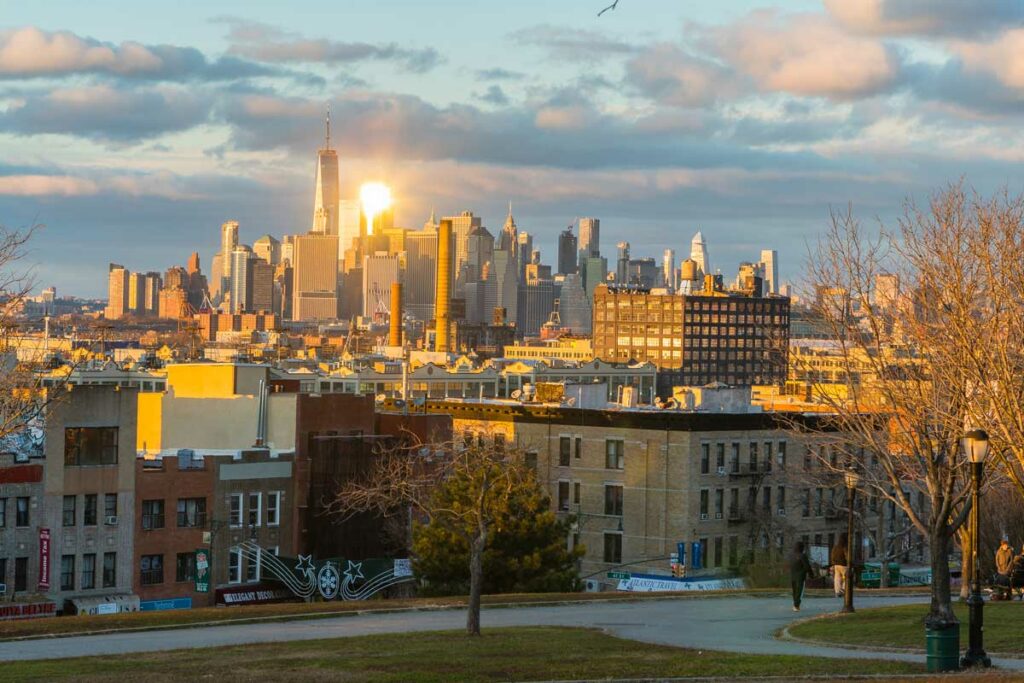
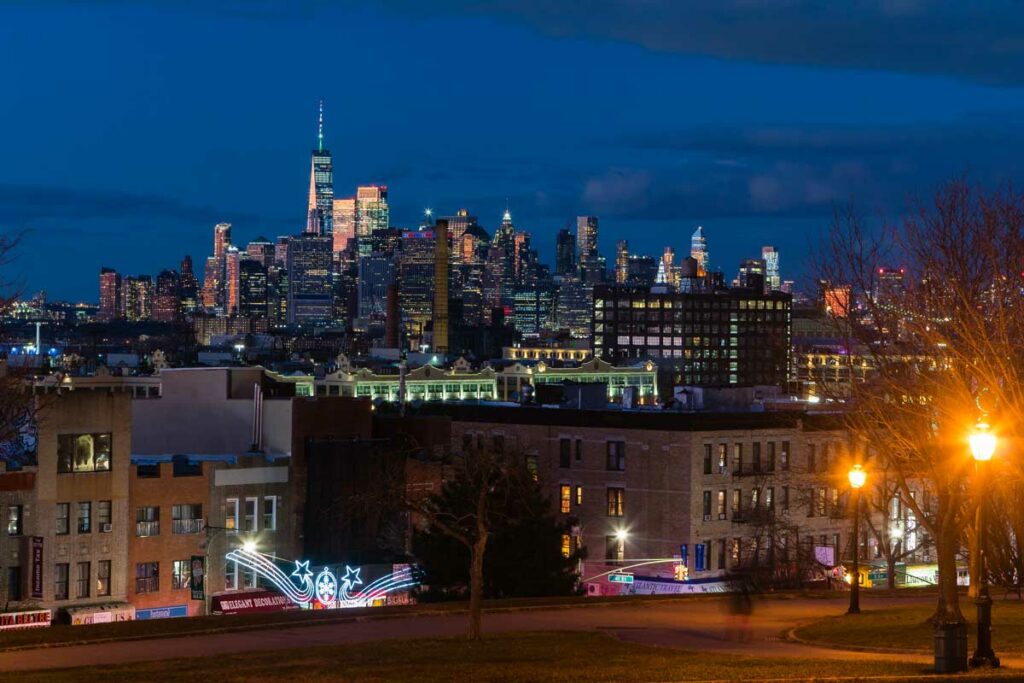
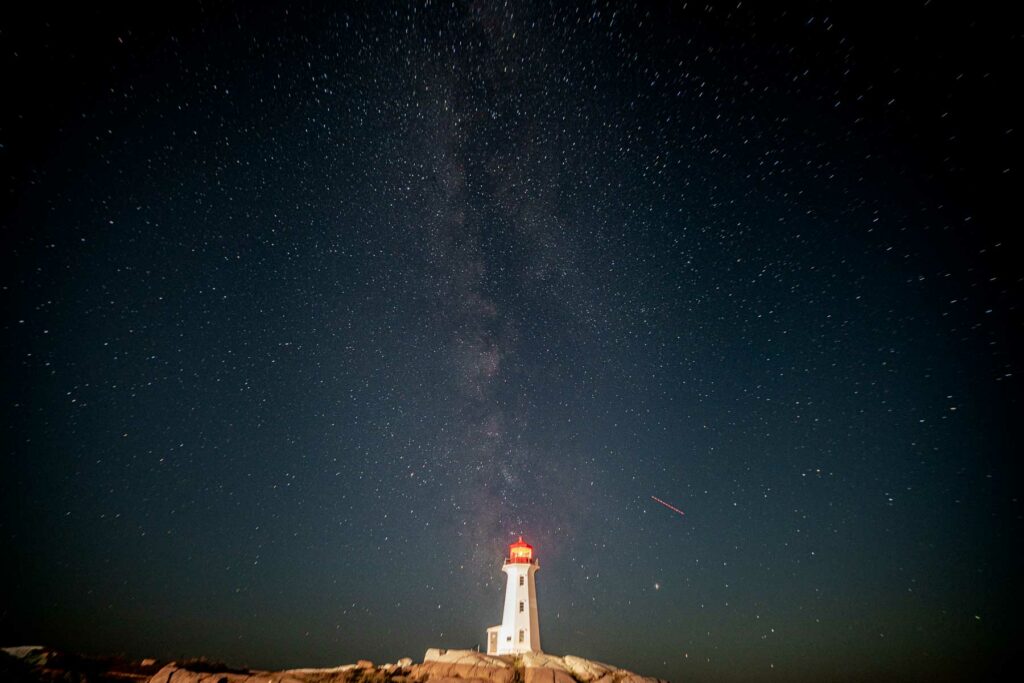
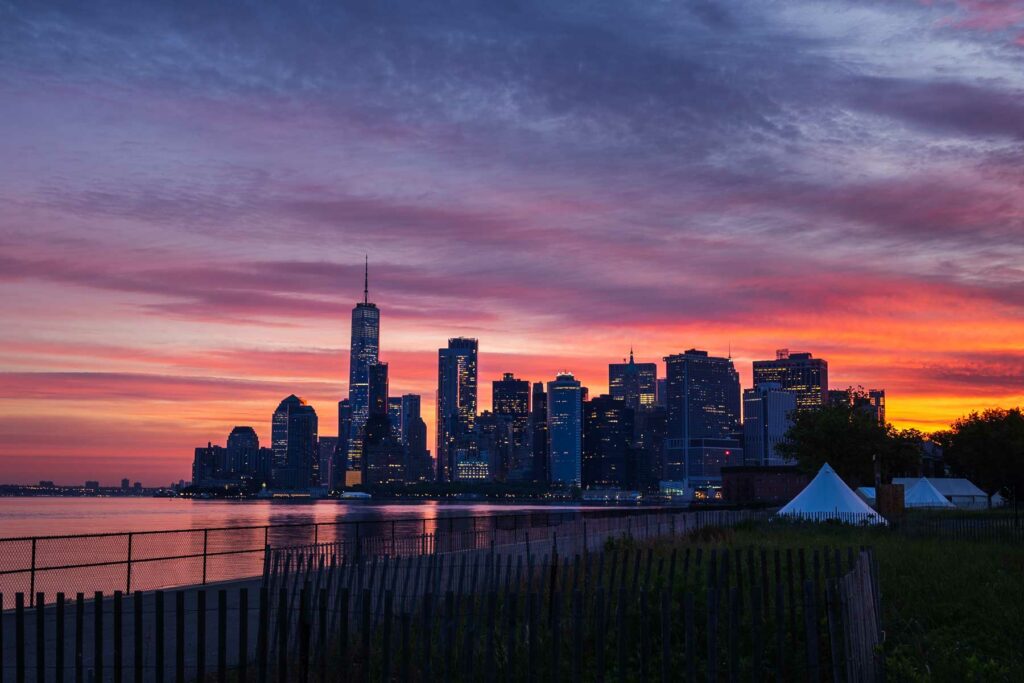
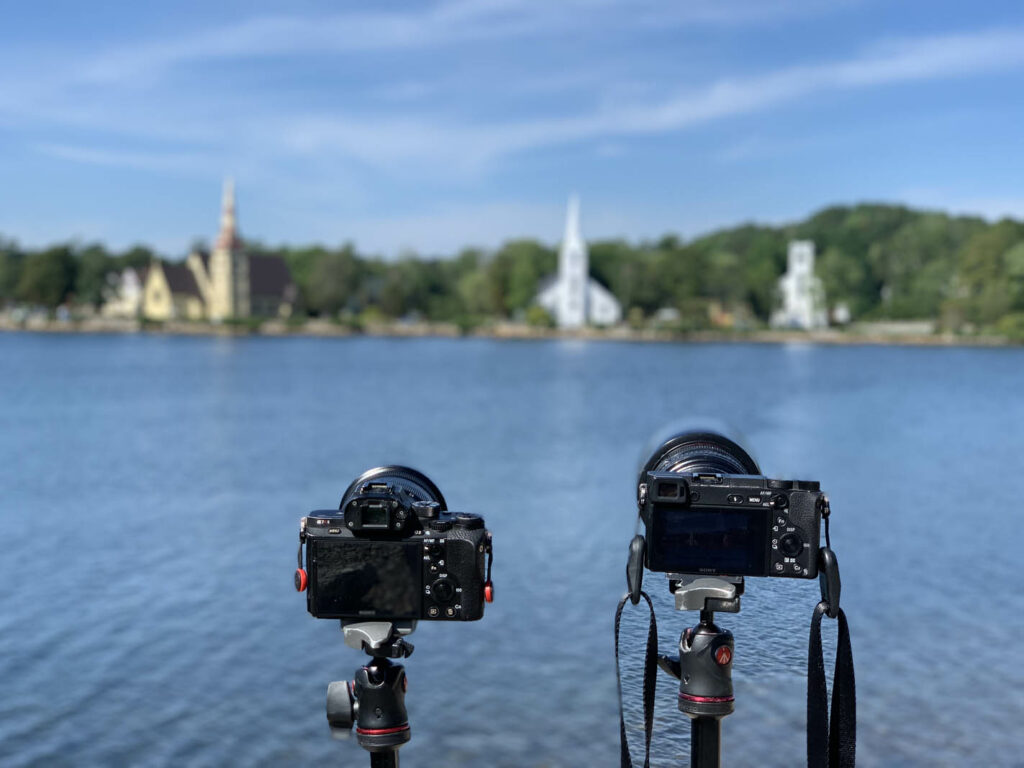
The reason why it is so difficult is that the light changes SO DRAMATICALLY from the beginning of when you started up until you ended the shoot. See the photos above and below as examples.
It was daunting because you’d have to manually change the camera settings over the course of hours without moving the camera and then have to manually adjust the settings in each photo to look as close to natural as possible.
TLDR, it was so tedious, that getting a good one, was considered like finding the holy grail.
Now it’s almost so easy there’s no wrong way to do it. But the rest of this is going to outline the easiest possible way while still getting great results.
Minimum Gear for Holy Grail Timelapse
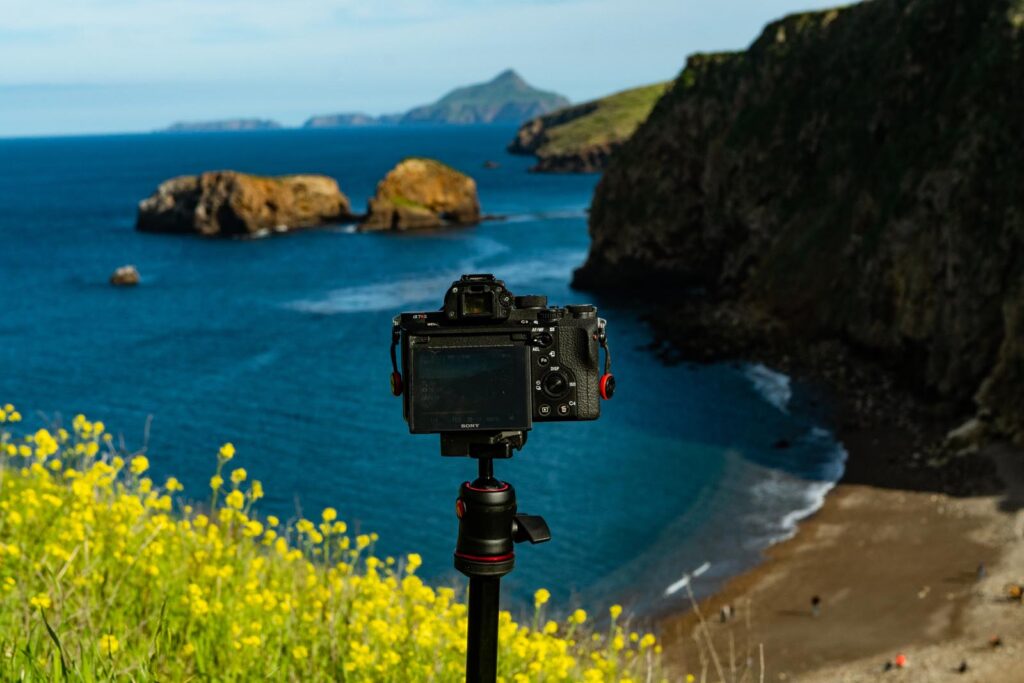
It goes without saying you need a camera, a tripod, batteries, and an SD card in order to shoot a holy grail timelapse.
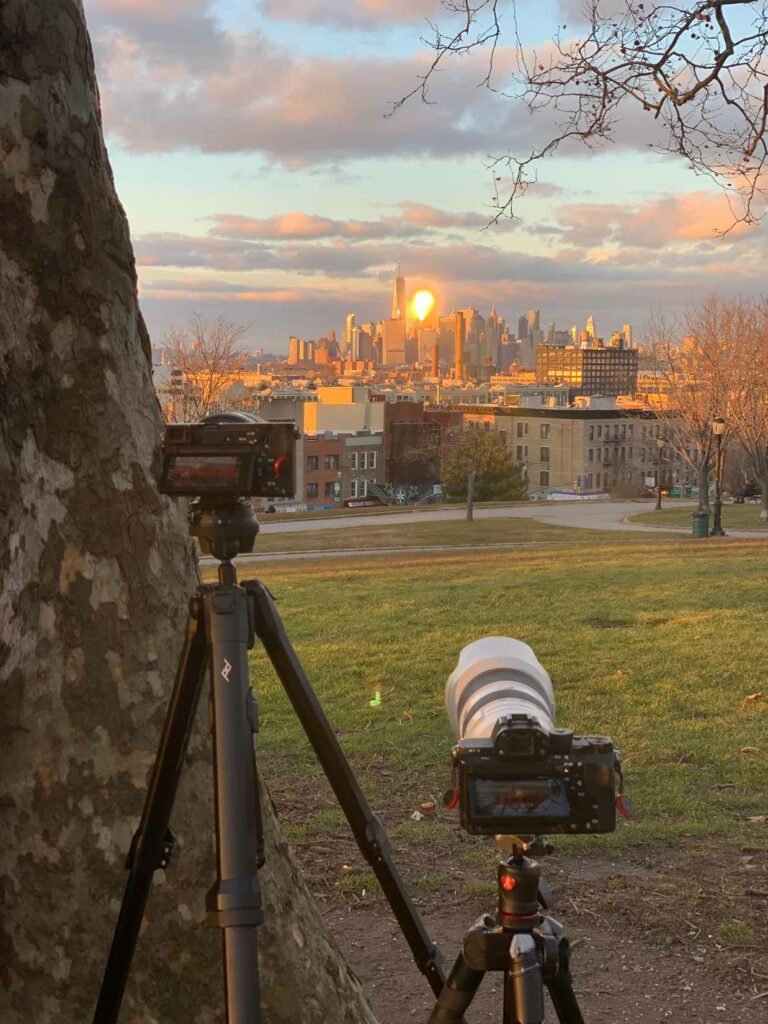
Your tripod should be both portable and sturdy. I love and recommend the Peak Design Travel Tripod. But I’ll be honest, sometimes I have to rent a heavier tripod for shoots because of wind.
If investing in two tripods is too much (which I totally get.) I recommend either the Peak Design Travel Tripod or the Manfrotto BeFree Travel Tripod. Both are lightweight, compact, and durable.
But those are also the cons because windy conditions will shake your setup.
Lastly a good weatherproof or resistant backpack that is comfortable. You’ll need this to carry everything.
I have used the Peak Design backpacks for the last 6 years and absolutely love them. Lightweight, waterproof, and carry a surprising amount of gear very comfortably.
What I love about the peak design bags is that my water bottle and tripod can easily fit on the outside so I always have two very important things when shooting. Water and a tripod.
Check out the prices on the 30L Peak Design Backpack. It’s comfy and can carry a lot!
Since you have a backpack. I recommend when prepping bring some extra layers, especially if planning to shoot long-term or overnight.
You never know when it may get cold and having things like gloves, a windbreaker, a beanie, and snacks might be the difference between a miserable shoot and a great shoot.
For compact wind jackets, I really like UNIQLO’s ultra-light jacket. It’s as light as a feather, stylish, and best of all folds up to be as small as a camera.
Even if you don’t end up needing it, it acts as an extra cushion for your gear.
Additional gear you might invest in later is sliders, gimbals, and other accessories to move your camera. But the steps will still be the same.
Nice to haves are things like a flashlight or headlamp since it might be dark when you begin or start making it difficult to see and easy to lose something.
As well as external hard drives to back up your footage.
For entertainment, it’s nice to have an audiobook, or music pre-downloaded in case you’re going offline.
Lastly, bring water, snacks, and extra layers so you don’t have to stop mid-shoot because of one of these silly reasons.
What Makes a Good Holy Grail Timelapse?
The key to getting a holy grail timelapse is reminding yourself why you are even shooting it in the first place. You want to see the scene change, and in this case the light as well.
So when you are on the location, ask yourself what the most interesting thing on the scene is.
Your composition rules like the rule of thirds and symmetry are going to be great rules of thumb to follow.
But you may also want to have your viewer follow the path of the sun. TV shows will often use a sunset time lapse to transition into nighttime. This is a great visual cue.
What makes a good holy grail timelapse is often going to be the nice beautiful colors of the sky, the dramatic change of light in such a short time. Or the silhouettes of mountains or buildings. Or maybe a setting where a city turns to life after sunset, or wakes up after a sunrise.
The best ones are going to combine the above with great composition. This is going to come with practice because planning and shooting a sunset time lapse are a bit tricky.
Super Easy Holy Grail Timelapse Settings
This is where the meat of this article is going to be. These simple holy grail settings are going to be something you want to bookmark and save so you can double-check it while you’re on your first few shoots.
Then eventually this will be second nature.
There are seven things we are going to check through to see if our camera has.
Time lapse settings – Aperture Priority
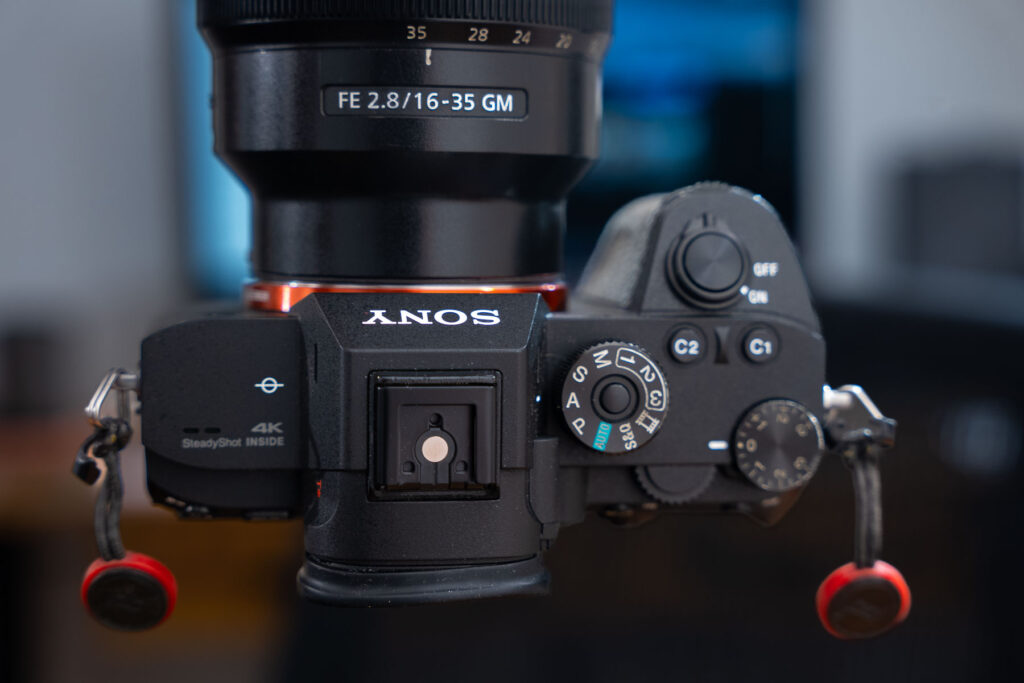
First, we want to put the camera in Aperture Priority mode. This is a semi-automatic mode that gives us the most flexible shooting options and is very reliable.
Aperture priority mode will automagically change all the camera settings in the shoot EXCEPT the aperture. This is exactly what we are after because we can SET IT AND FORGET IT.
Time lapse Settings – Intervalometer
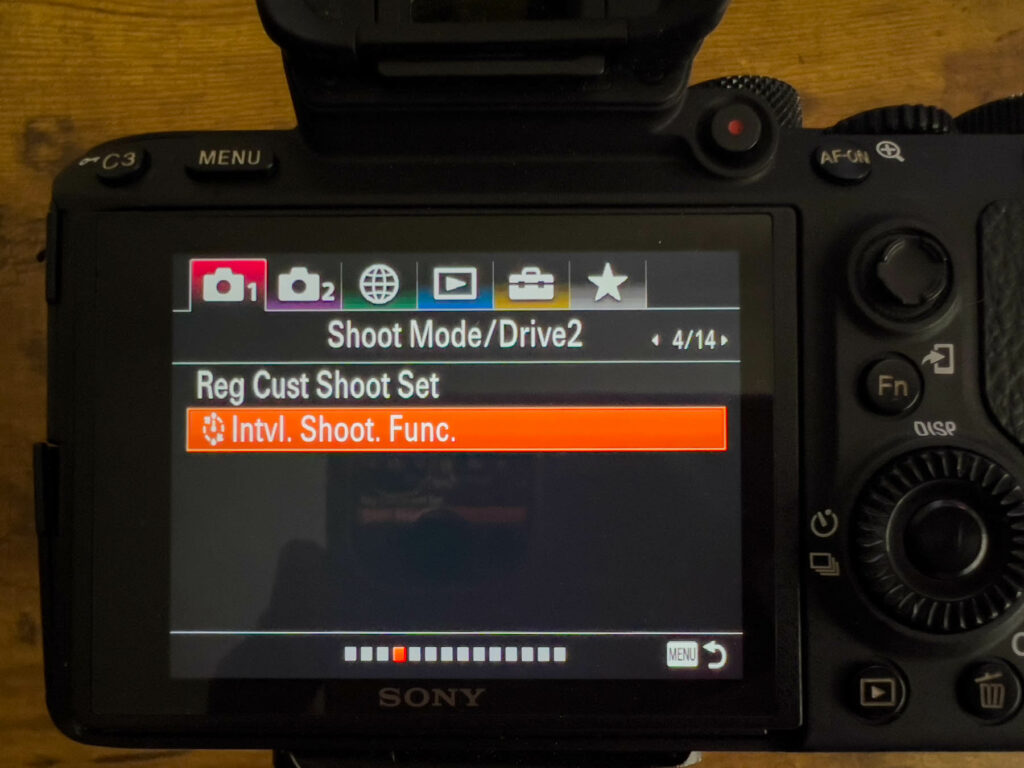
Second, we want to turn on our Intervalometer. This will activate the time lapse function. We can’t begin a time lapse without doing this.
If your camera doesn’t have an intervalometer, don’t worry. You can buy one for $20 online. Just choose one that is compatible with your camera model.
Here are some amazon links to intervalometers for Canon | Sony | Nikon.
If I didn’t mention your make, just google intervalometer for “name of your brand.”
Intervalometer Settings for Holy Grail Timelapse
This example is with the Sony Intervalometer settings, if you don’t have all of these options don’t worry. They aren’t necessary and I will give you an alternate option in each step.
The main thing here is to know I’m going by each of these steps one by one below. There are two pages or five things we will cover.
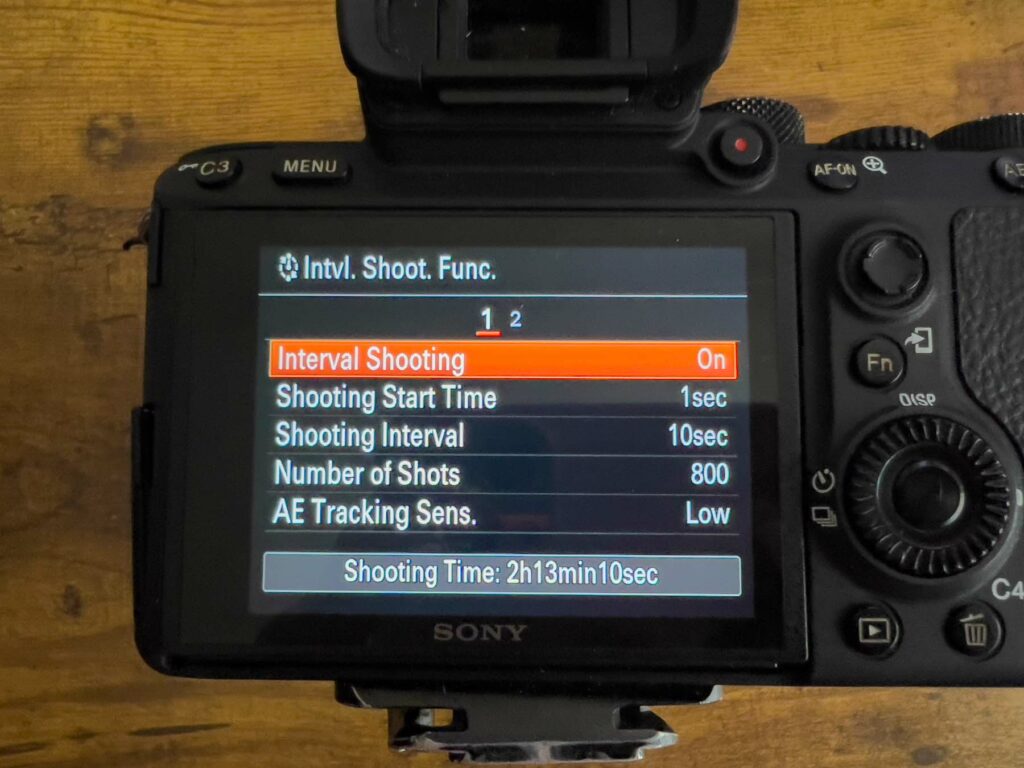
Shooting Interval Settings for Holy Grail Timelapse
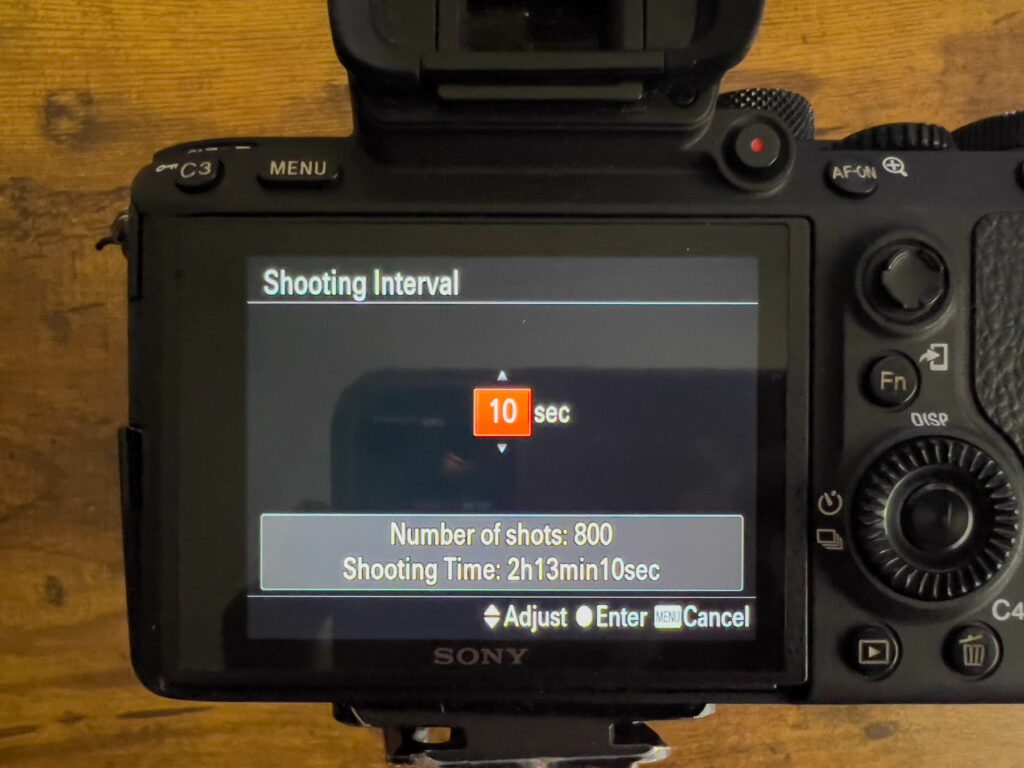
Choose an interval. An interval is the amount of time between each photo that the camera will take.
It is one of the most important things to understand when shooting a time lapse or hyperlapse. The interval we choose has a large impact on the final scene and dictates how quickly the final video plays.
If we choose a fast interval like one or two seconds, the sunset or sunrise that we are trying to watch WILL TAKE FOREVER!
I’d only shoot a holy grail timelapse with a 2-second interval if I had a SPECIFIC REASON. Like having the ability to time remap to a specific point of the time lapse.
If this is your first time doing it, keep it simple and choose 10 seconds. Over time you can adjust this to your own specifications but we all need a starting point.
Number of Shots for Holy Grail Timelapse
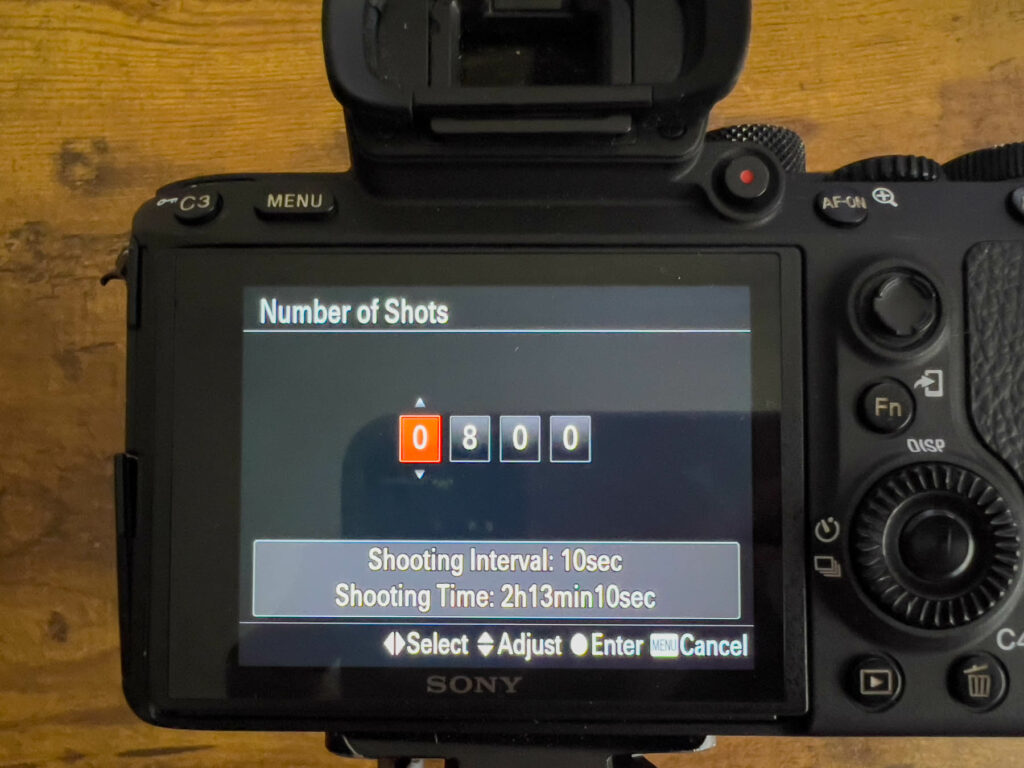
Choosing the number of photos for a time lapse can be a challenge but it comes with time. A rule of thumb is you want at least ONE HOUR BEFORE AND AFTER the sun sets.
That’s why I chose 800 photos as an example because it gives us just over two full hours of shooting time. I should plan to arrive AT LEAST one hour before the sunrise or sunset that I am trying to capture.
AE Tracking Sensitivity Settings for Holy Grail Timelapse
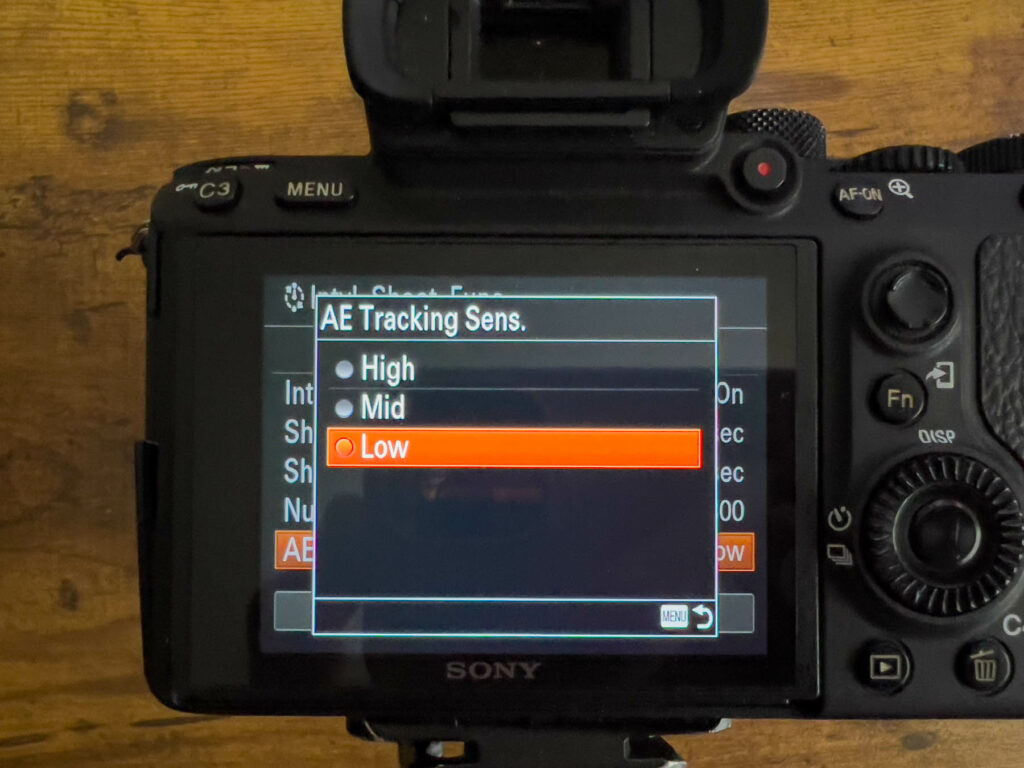
If you have this option great, change it to low. It’s basically the camera asking how sensitive should it be when light changes in front of the camera.
I tend to believe that I don’t want my camera to be too sensitive and overreact.
The alternate version of this is your metering mode. Just choose the center metering mode. Honestly don’t overthink this.
Turn Shoot Interval Priority On for Holy Grail Timelapse
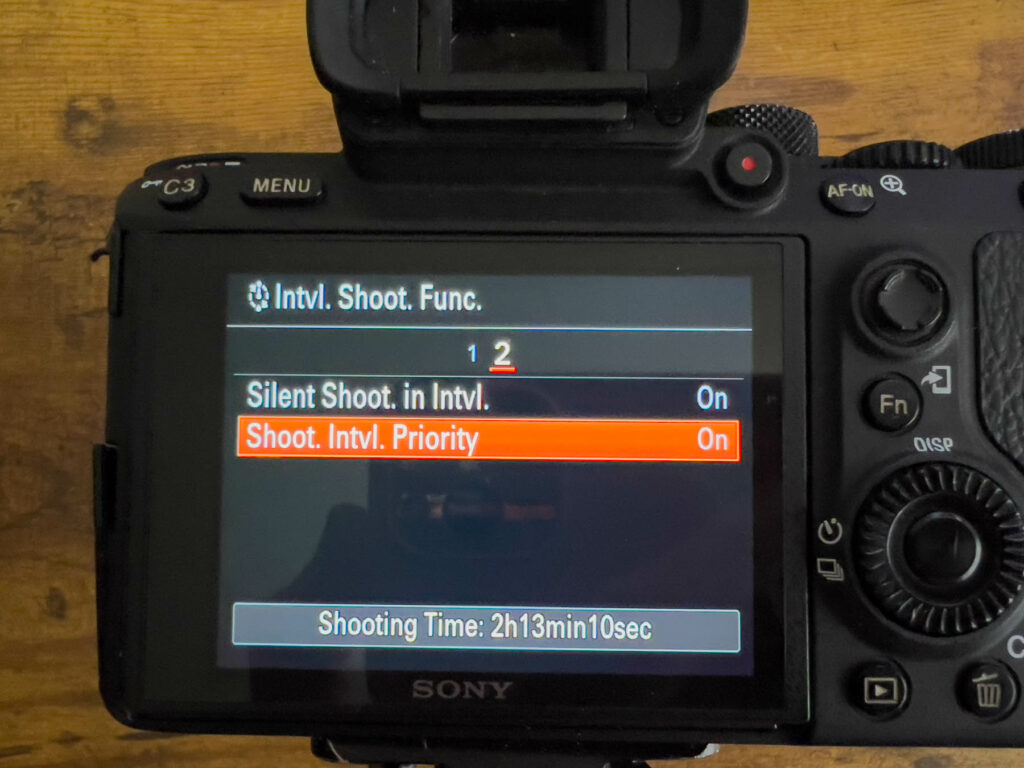
This is actually a pretty cool setting to have. Basically what it does, is say HEY CAMERA, since we’re shooting a time lapse. Let’s make the interval the #1 priority that dictates EVERYTHING ELSE.
So if our interval is something short like two seconds, but our shutter speed is going to be three seconds. The camera will automagically override in the favor of the INTERVAL and adjust all the other settings.
Set a Min/Max ISO Settings for Holy Grail Timelapse
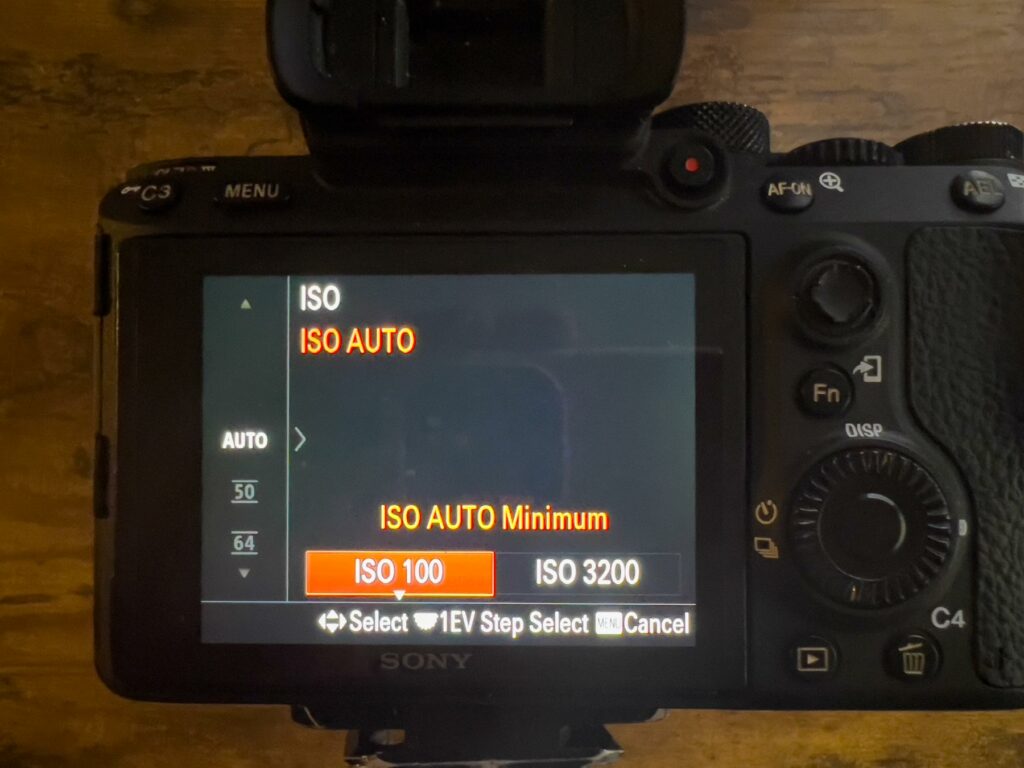
If you have this option this is REALLY cool. It allows you to set a minimum ISO and a max ISO that will automagically update each time you take a photo and the light changes.
I have mine set to a minimum of 100, and a maximum of 3200.
Choosing a Shutter Speed for a Holy Grail Timelapse
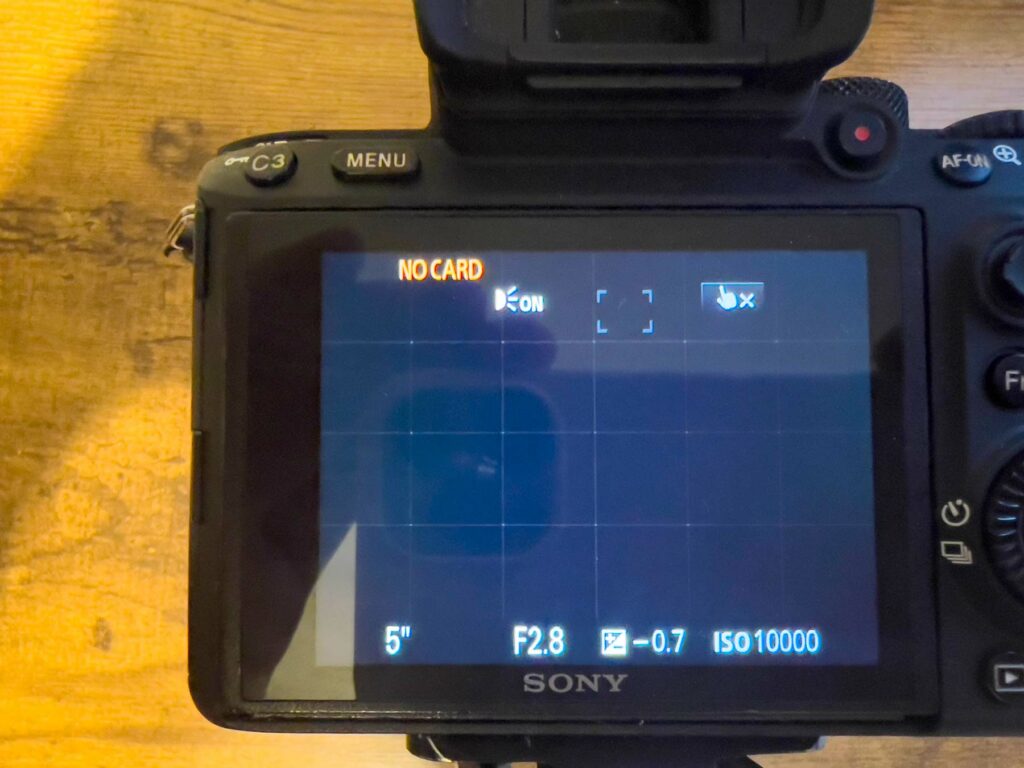
Since a timelapse is going to be played like a video. I want to share a CORE CONCEPT to videography. If you put your hands in front of your face, and wave them. You will see motion blur.
So we want to choose a shutter speed that gives us motion blur.
It’s really easy to do. If possible, choose a shutter speed of at least half a second.
But I’m also going to tell you an advanced technique in case you want to do this once you get the hang of it. Our eyes see at 24 fps.
That’s worth noting because there is a term called the 180 rule. The simple explanation is to mimic our eyes, we want to choose a shutter speed double our frame rate.
So when we shoot video and are recording at 24fps, we want our shutter speed to be 1/50th of a second. We do this because that mimics how our eyes see and is more pleasing to watch.
We can apply this to our time lapses as well. The basic idea is that we want our shutter speed, to be 1/2 of our interval. Ensuring motion blur throughout the shot.
Since I recommended earlier, choosing an interval of ten seconds. That would mean our shutter speed should be five seconds long.
Obviously, this isn’t always possible. But the rule is still helpful to remind you to get your shutter speed for your time lapse or hyperlapse as slow as you possibly can because you want that motion blur.
So try to get as close as possible to half a second if you can. If not, don’t let it stop you. But you might want to pick up an ND filter.
Six Mistakes to Avoid Shooting a Holy Grail Timelapse
Here are the biggest mistakes I’ve made when shooting a holy grail timelapse.
First, mistake I made was using an ND filter. Only to realize it was getting too dark and try to take it off and bumping the tripod, changing the focal length, and focus, and ruining the shot.
Since it will get so dark, the shutter speed will eventually get so slow that it might ruin your interval.
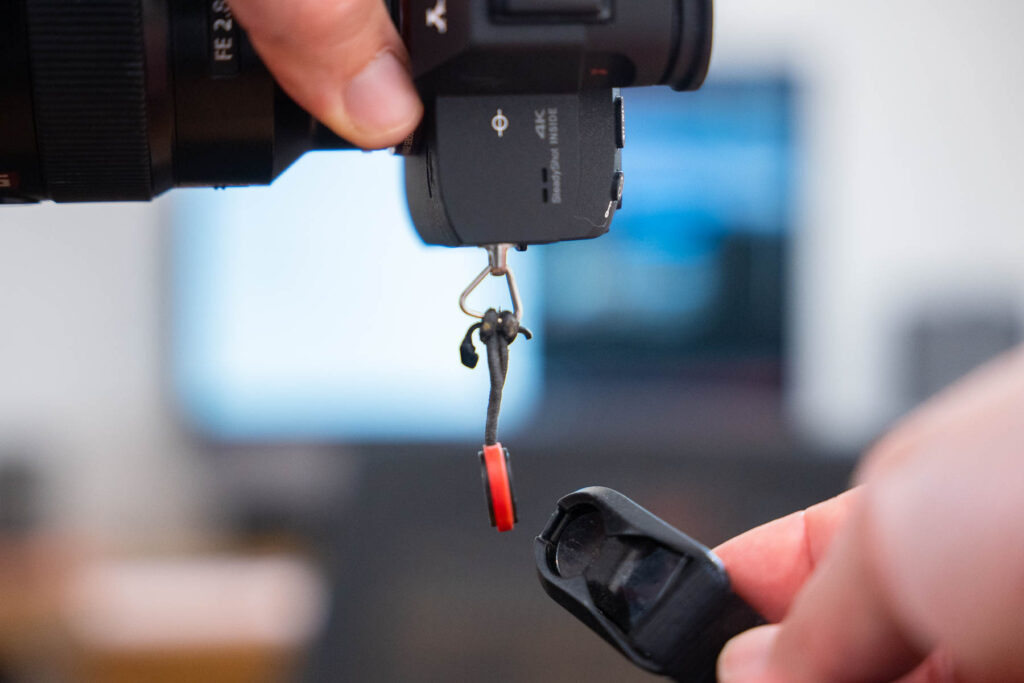
Second, leaving your camera leash on. This will cause it to blow around in the wind, potentially ruining your shot. I like to use Peak Designs clever quick release leash.
Second, most people arrive way too late. If you want to see the sun setting in your scene, you will need at a bare minimum one hour before the sunset.
So be sure to arrive early. At the bottom of this post, I show you the tools I use to know exactly where to be, when, and how to get there on time.
Third, forgetting to charge camera batteries and make sure we have enough storage on our SD cards. Super easy to forget.
For smartphone users make sure you have a decent amount of storage or backed up to the cloud. As well as having your phone charged or a battery pack.
For DSLR users it’s forgetting to charge extra batteries and having an SD card that will fit all the photos you are trying to take!
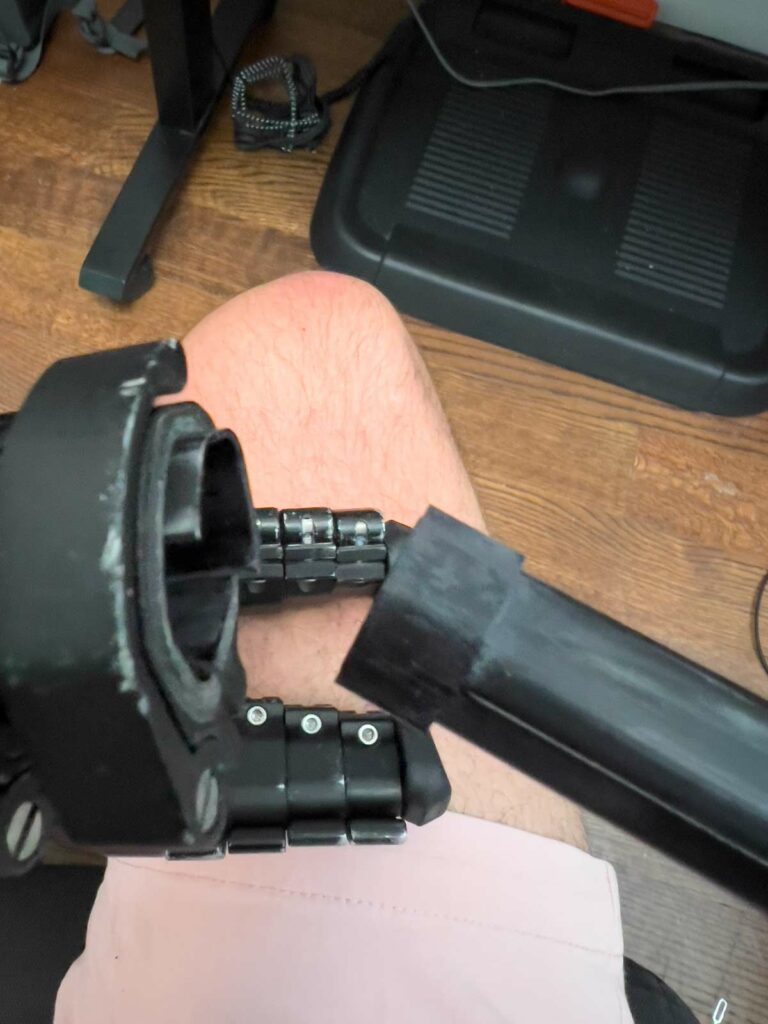
Fourth, is checking your camera too often and kicking your tripod. Again, sounds silly, but it is so easy to do. Luckily there are ways to fix it if this does happen but it is not perfect and definitely not ideal.
Fifth, is not having a flashlight. Without a flashlight that can be a real challenge and you may accidentally lose a piece of gear on the location and that would really suck to lose an expensive item because of not having a $20 flashlight you bought on Amazon.
How to Edit a Holy Grail Timelapse with LRTimelapse
Editing a Holy Grail Timelapse is actually really easy, especially with LRTimelapse.
LRTimelapse stands for “Levels and Ramps” but the way I like to tell people is to work from LEFT to RIGHT!
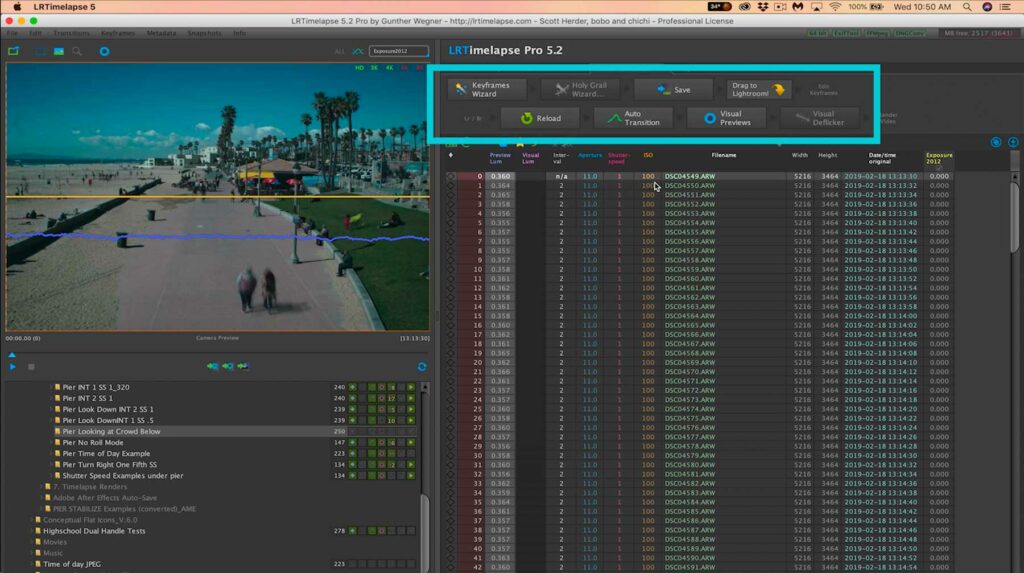
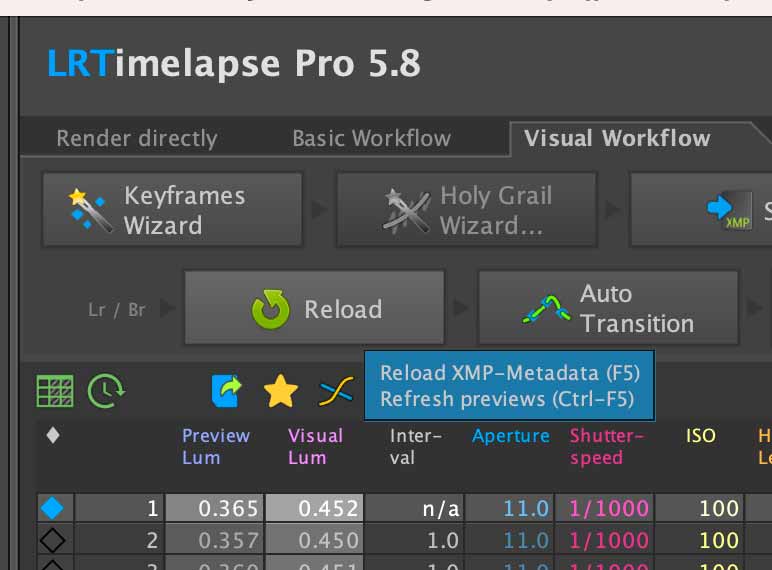
You literally just follow the prompts in the box above. You press each button in sequential order. Super easy. So let’s do a simple walkthrough.
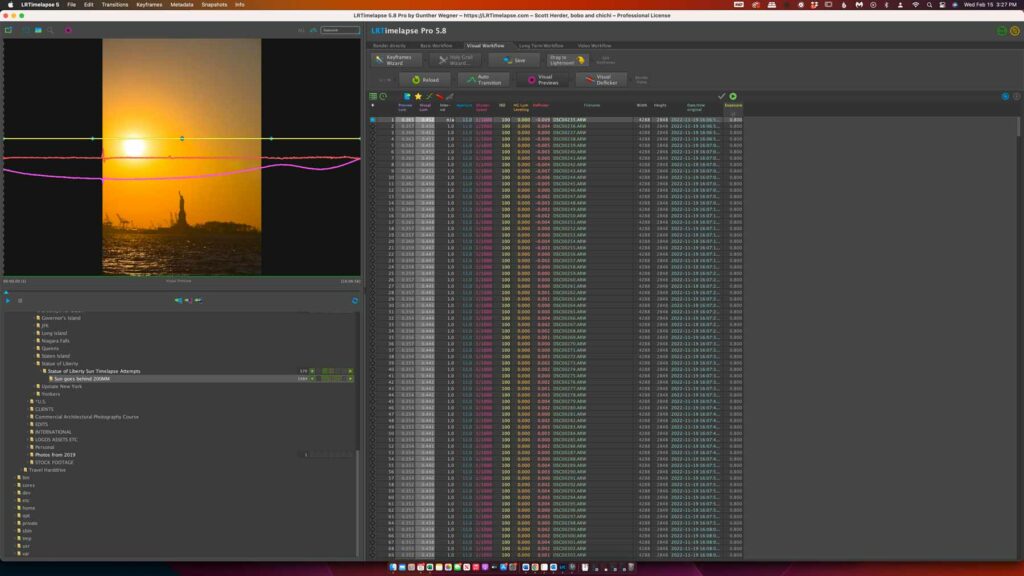
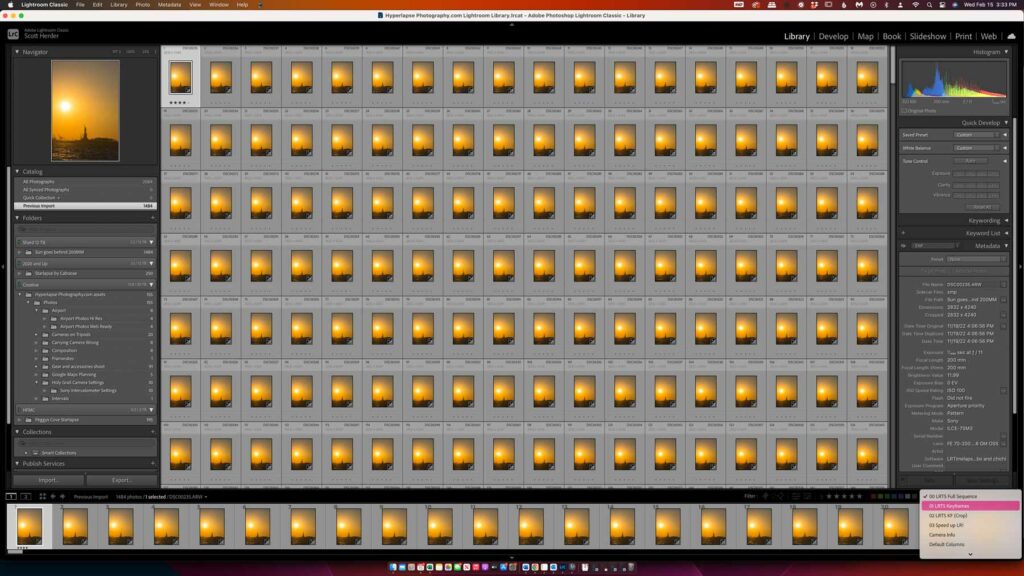
This photo is what the plugin looks like. The bottom left is your time lapse file navigation. The top left is handy preview of your footage, the top right is the buttons you click for a visual workflow and underneath it is all your camera settings.
When you are ready to edit your holy grail timelapse sequence click on the Keyframes Wizard directly to the right of the preview window. See the circle image below.
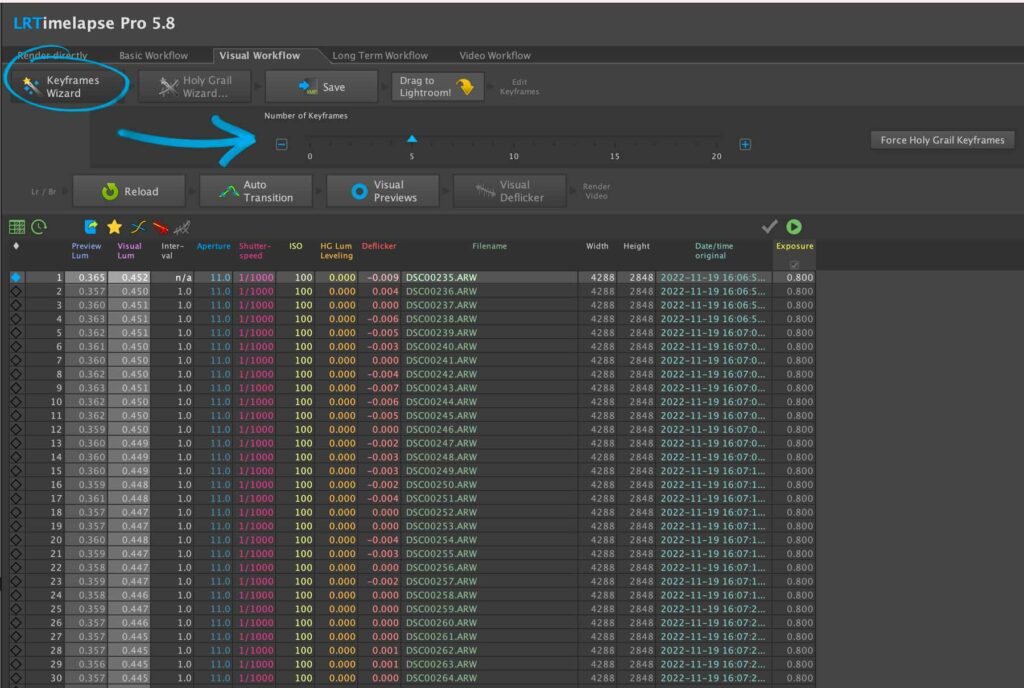
When you click the keyframe wizard a little drop down appears. Here you can drag the slider to make keyframes.
The number of KEYFRAMES you have is the number of photos you will be editing. For holy grail at least five keyframes, and I rarely ever go above nine. But you are free to make as many as you’d like.
Once you have the desired keyframes you like move to the button to the right, and press save.
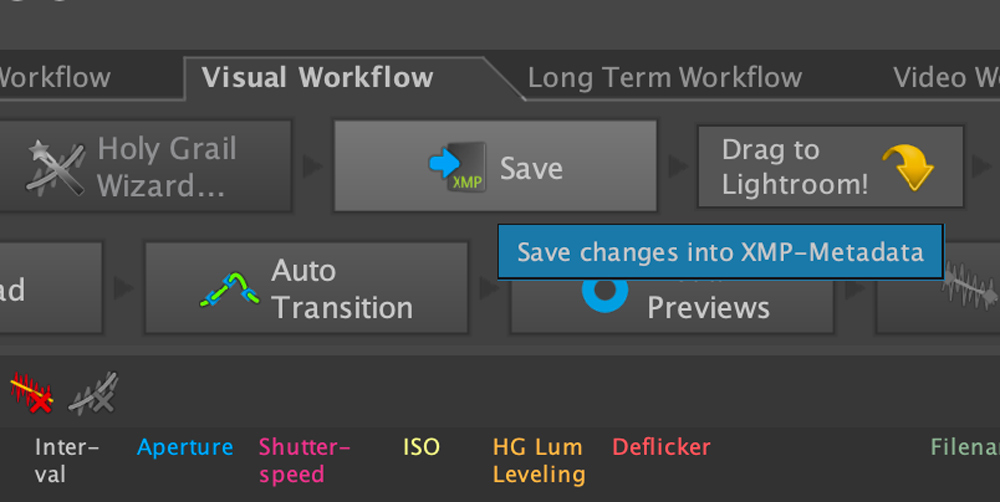
Once you press save (button example above) again move from left to right and follow the prompt of the next button.

Drag to Lightroom. Have lightroom open and simply click and drag this button on top of your Lightroom Icon and it will automagically open lightroom with all the photos pre-loaded ready for import. You’re halfway done already.
*If you already imported your photos into Lightroom, they will be grayed out.
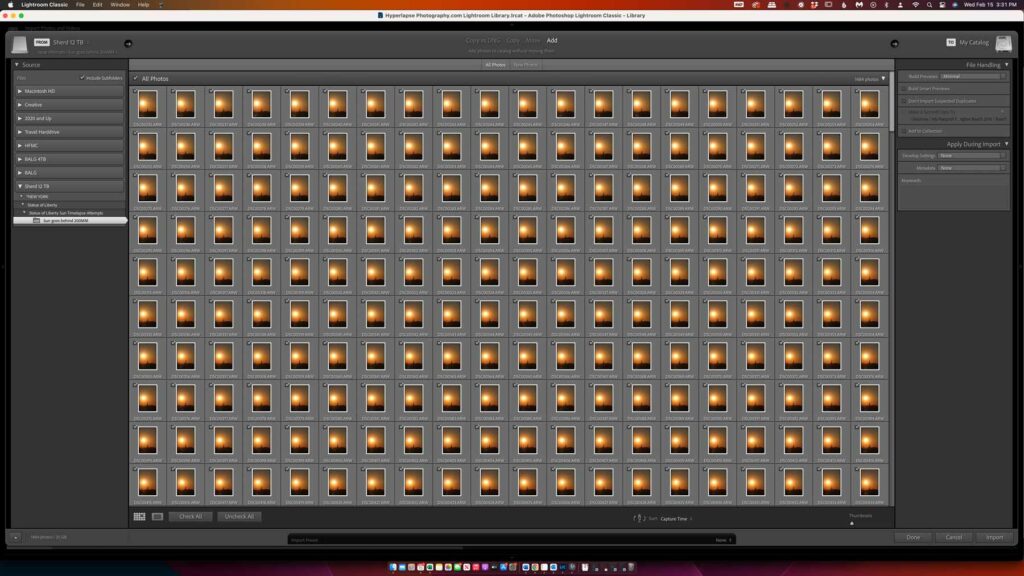
Import your photos. At this stage press the import button at the bottom right of the Lightroom dialogue.
Once imported we need to edit each of the images we made a keyframe for. To do this go to the bottom right panel of your Lightroom Dialogue and toggle LRT5 Keyframes. This will pull up only your keyframed photos.
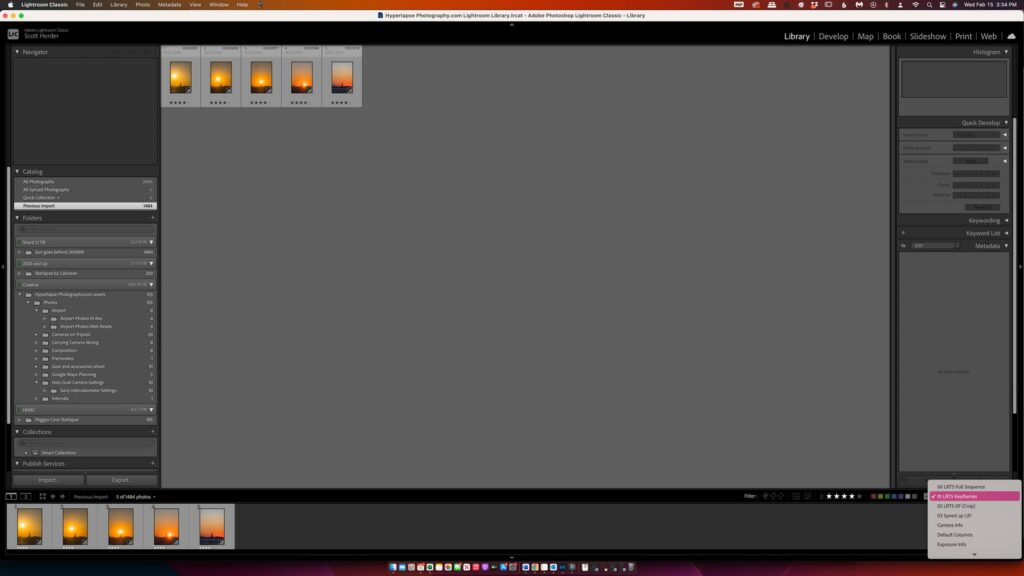
Once you are here, just press D to enter your “Develop” settings and edit the first photo on the left to your liking. Once you’ve edited the photo and are happy with it. Press Command A on a mac, contrl A on a PC, to select all the images.
Notice how in the photo below, you can see all the images on the bottom left corner are selected.
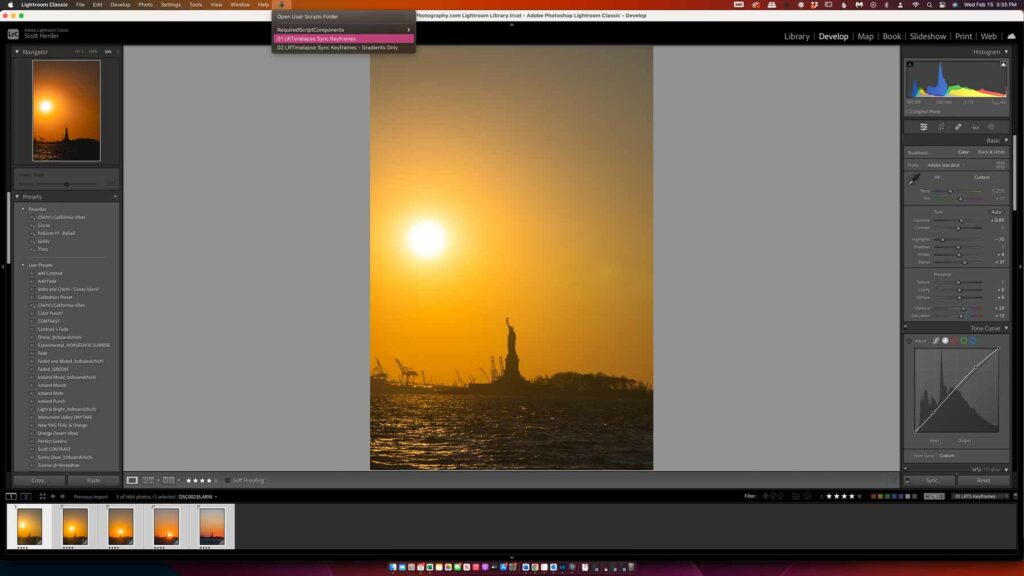
Once you have all the images selected, at the top of your computer you will see an icon that looks like a black script. Click on that and select sync keyframes.
This will automagically sync the edits from left to right. Now, all you need to do is go through each of the photos to the right and edit each of them to your liking.

Your photos SHOULD GET DARKER, or brighter if you shot a sunrise. You may need minimal edits but the two things to keep an eye out for are the darkness and the white balance. It’s not unusual for the white balance to change by the thousands.
Once your happy with all your edits. You want to press “G” this will take you back to your Library panel. From here select all your images by pressing Command A or Control A on a PC.
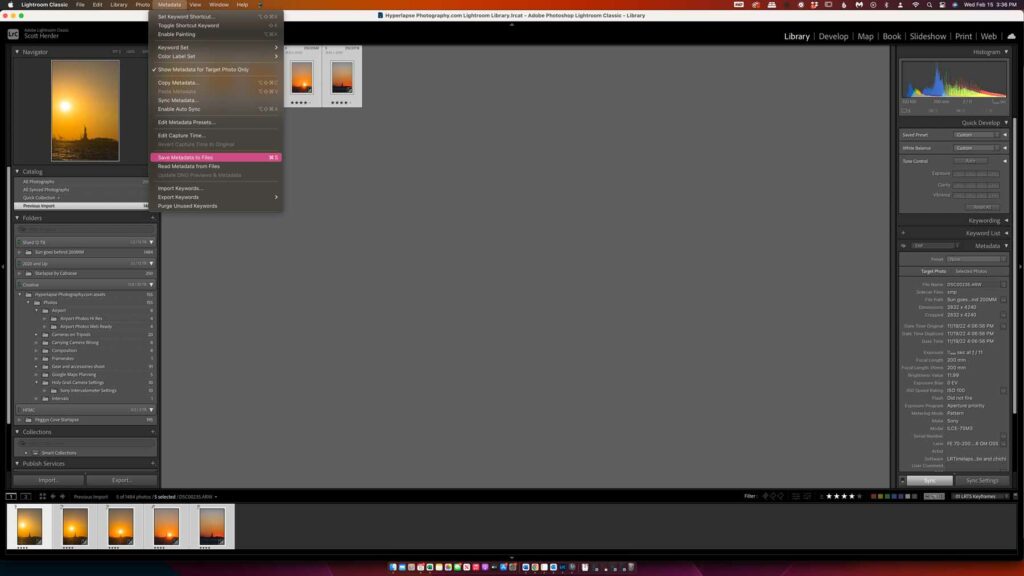
Then you can press command S to save all the edits, or Control S on a PC. Alternatively, you can go to the top and where it says metadata click on that and select the option that says “save metadata to files” as shown in the image above.
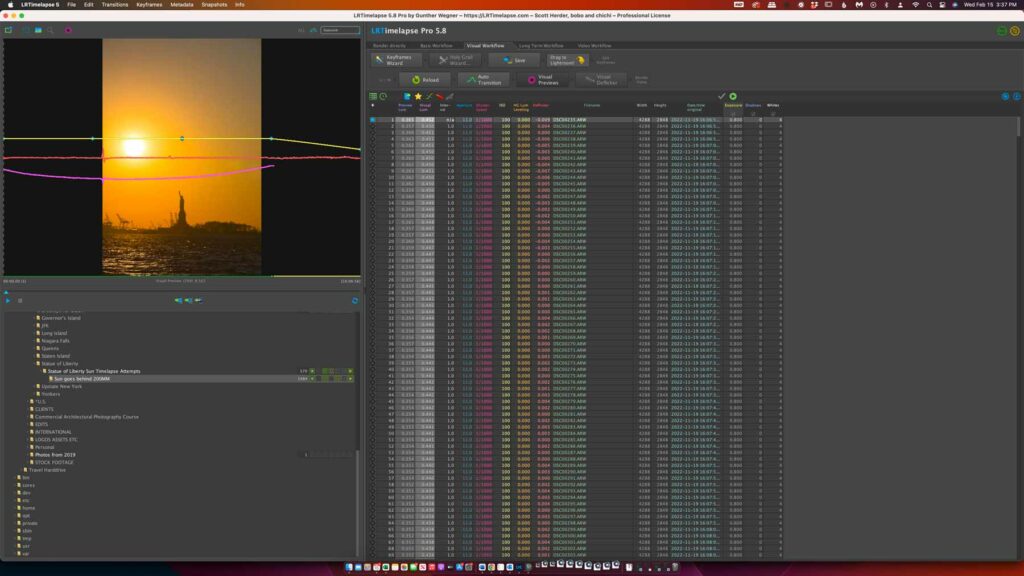
Once you are done here. You just have a few buttons left to click. Go back to LRTimelapse and click “Reload” as indicated in the following photo.
This will tell LRTimelapse to reload with the new metadata that you edited in Lightroom.
Then press auto transition. LRTimelapse will automagically edit the rest of the photos to seamlessly blend any changes in the color to match and deflicker the sequence.
It’s amazing how far this tool has come. It almost always works perfectly at this stage. But in the event it doesn’t we have two last tricks.
These last couple steps are optional now. The third button, “Visual Preview” is exactly what the name implies.
A way to visually see the edits in real time. Click it, and your computer will make all the edits and preview them to see if you are finished. You’ll hear a DING when the computer is done.
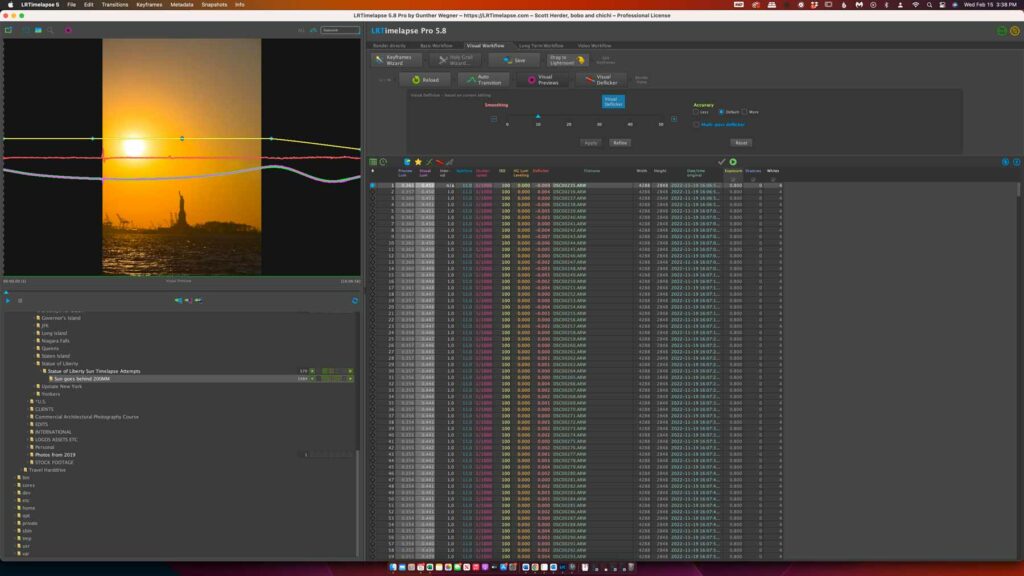
If when you preview it, you need some additional deflickering, that’s what the last button “Visual Deflicker” is for.
When we press it another slider appears. This will help us smooth out any unsightly jumps if there were any in our video.
I normally leave it at 10 as that is really pretty good. You even have the option to do multiple passes for sequences that just look terrible still. Don’t do that yet it’s not necessary. Click Apply.
Now you have the option to click visual preview again and repeat those last two steps until your happy with the results.
Go into Lightroom, in the Library mode, and SELECT ALL the photos.
Then press export, when the dialogue box pops up use the LRTimelapse export function. If you have pro you can export as TIFF, or JPEG, and if you are using the FREE VERSION it’s limited to 400 photos and JPEG only.
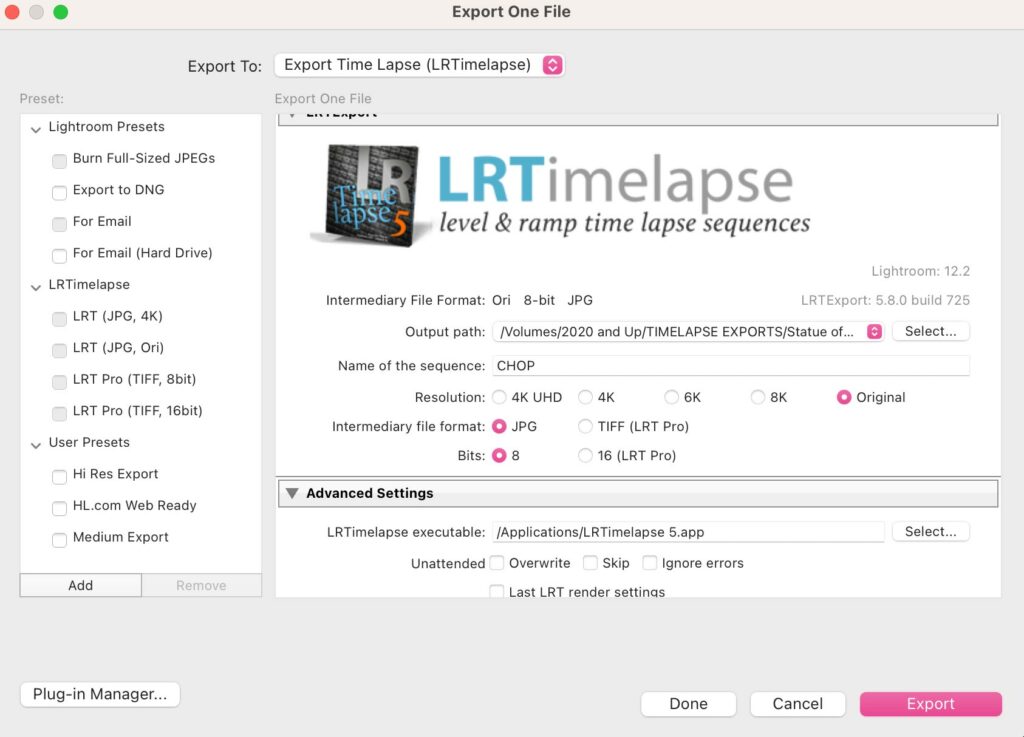
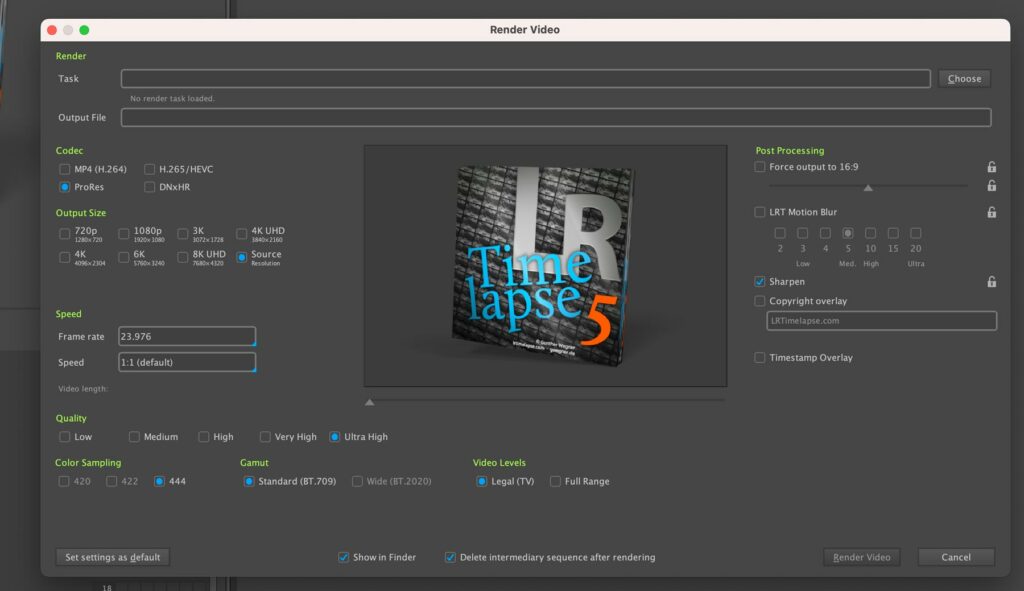
Once that is done, it will automagically initiate the LRTimelapse export dialogue box. Where you can render out your final project!
Share Your Holy Grail Timelapse
I love sharing my time lapses on social media. I do it pretty regularly on Instagram and TikTok. There is also a pretty active Facebook Group and subreddit dedicated to time lapses that would be a great place to share.
Backup Your Your Holy Grail Timelapse
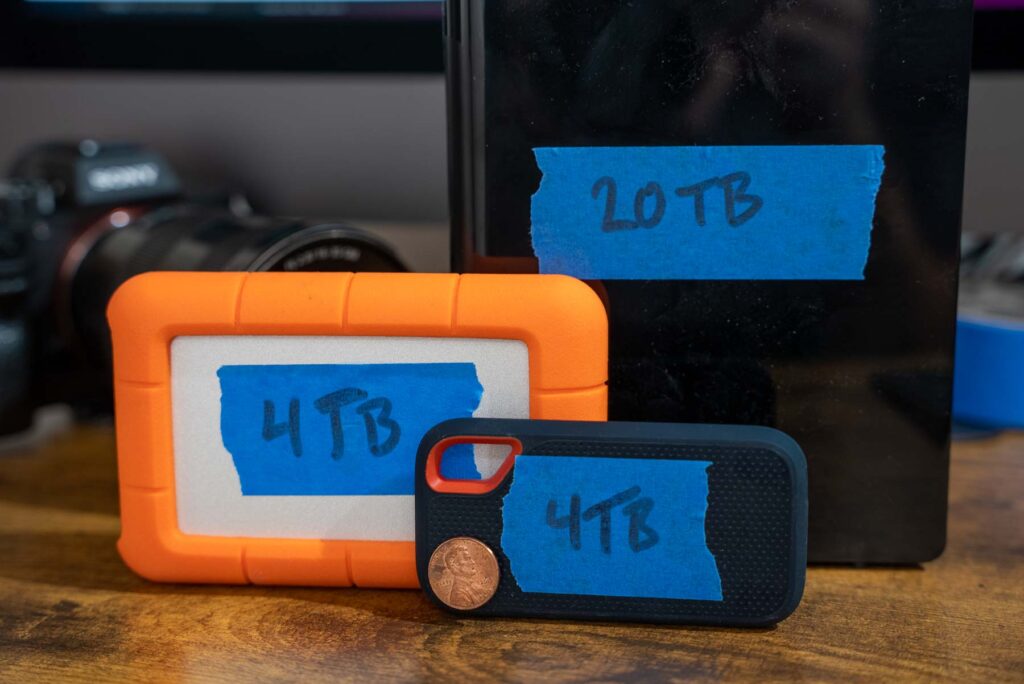
The last thing I strongly recommend getting into the habit of no matter what type of timelapse you shoot is backing it up.
There are so many ways to do it, whether that be the cloud, dropbox, or even putting a folder on your hard drive called Edited Time lapses and making a habit of putting your finished projects there.
*Bonus Planning your Holy Grail Time Lapse
Planning ahead is probably the best use of your time for any time lapse, but especially a holy grail because of the time commitment. So I want to share with you three tools I use religously to help me plan any and every shot I do.
Google Maps
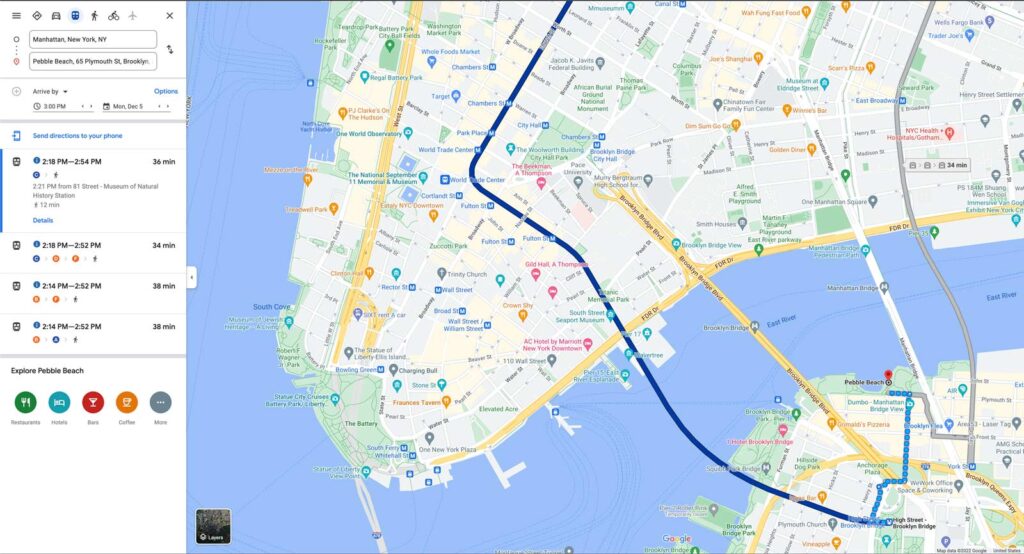
I use this all the time, it does two things really well. First is the most obvious, it gives me directions. This is obviously helpful, but if you look carefully at the photo above, you can actually tell maps what time you want to arrive by. This is INCREDIBLY helpful.
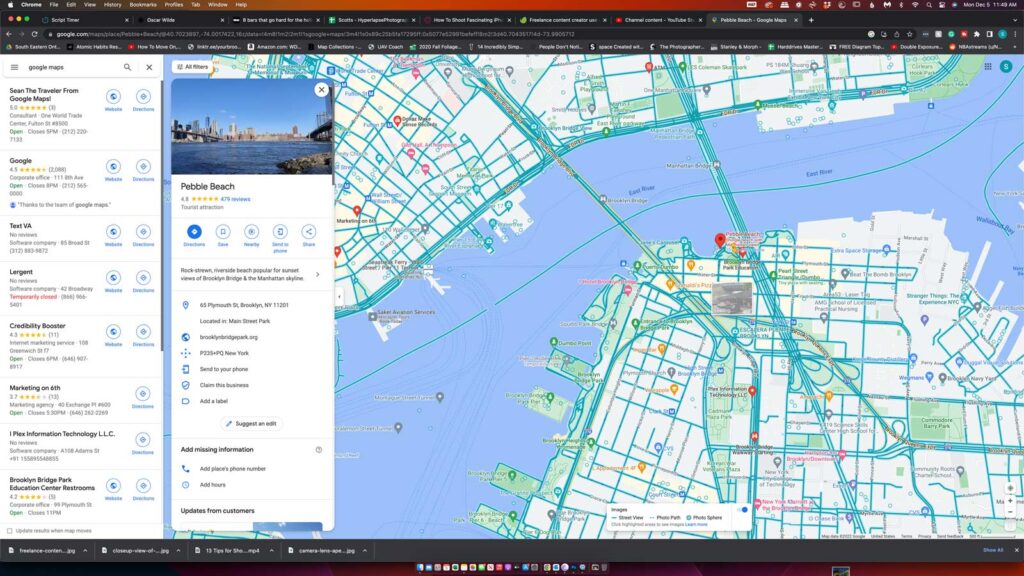
Second, google maps allows you to also drop in and see what the view looks like. To activate this all you need to do is grab the little yellow iocn and drop it somewhere. The blue lines indicate where you can get a view.
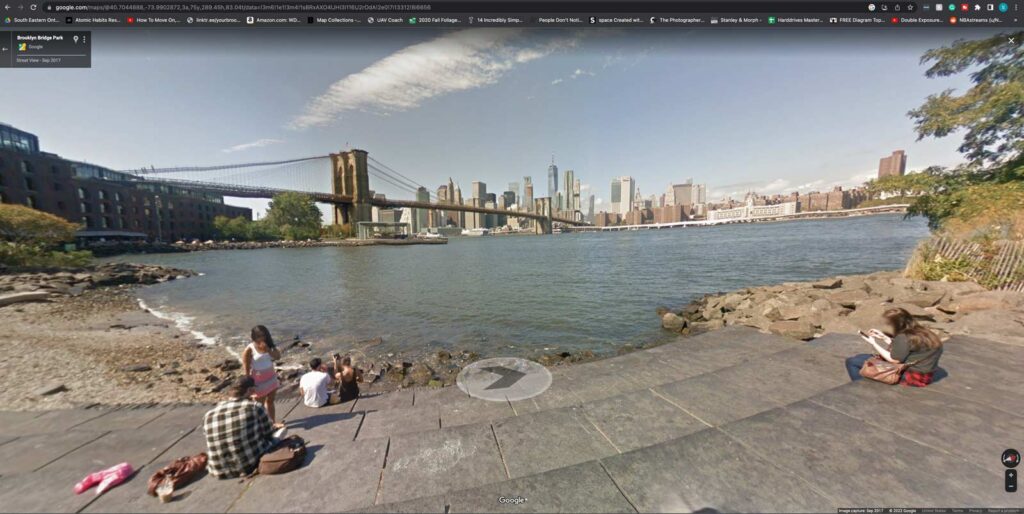
This is very helpful because now I know if there will be things obstructing my view, what it looks like when I arrive. This scene looks pretty comfortable to sit in, but others won’t be. So this will help me get an idea of what I might need to bring.
The Photographers Ephemeris
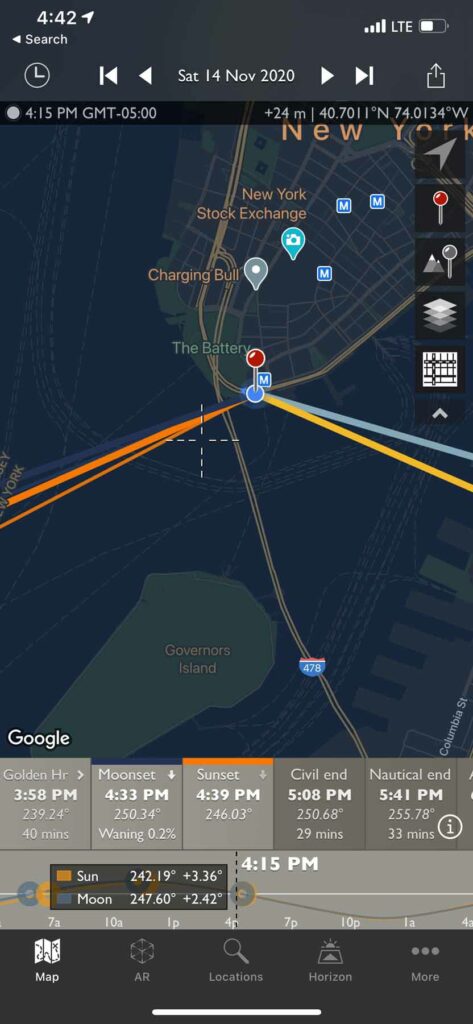
The Photographer’s Ephemeris is a handy app that helps you plan out where the sun, moon, stars, are and what they will be doing minute by minute. It is free on the desktop and 10$ in the android or apple app store.
I use this for any sunrise or sunset time lapse that I will do. It’s worth every penny.
Photo Pills
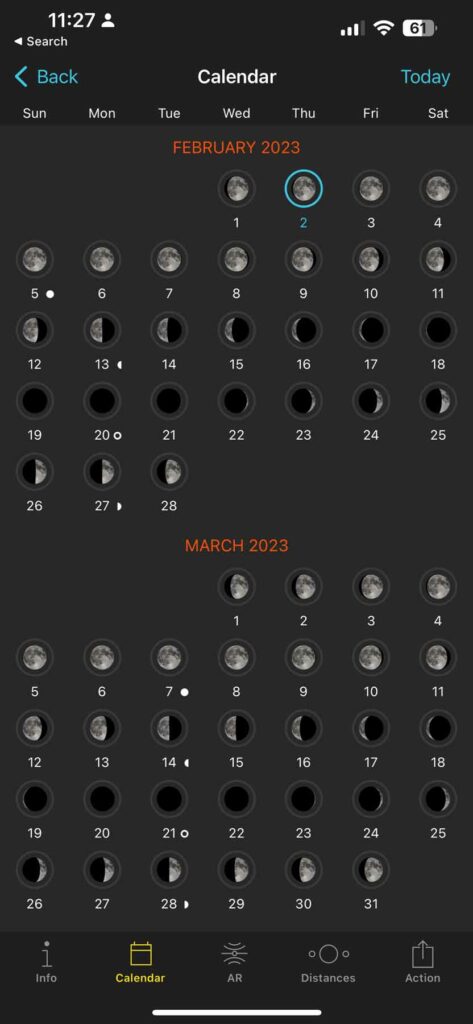
PhotoPills is pretty much the exact same thing as The Photographers Ephemeris if I’m being honest. I prefer it specifically for shooting the moon, the stars, and its augmented reality feature. In my opinion it’s just better than TPE for those specific things.
It is also 10$ in the google play or app store, but again, worth every penny.
I use this app specifically for planning the stars, but it could also replace TPE if you only wanted one.
Alright well those are all my tips, I hope you have a great time shooting your holy grail timelapse.
If you want to level up your time lapse and hyperlapse game so you can charge more money and save hours of headaches and frustration. I have made a course for you that over 400 students have enrolled in!
I’m confident Hyperflow Masterclass will get you from zero to shooting like a pro or I’ll give you your money back!
Check out the course here to see if it’s right for you.
Frequently Asked Questions about Shooting a Holy Grail Timelapse (FAQ)
Here are the most common questions people have about how to shoot and edit a holy grail timelapse.
A holy grail timelapse is a timelapse that is referring to a day to night or night to day timelapse. Where the sun either sets or rises. It’s called this because of how difficult it used to be to achieve.
Same as above, just referring to something captured on a photograph that is very difficult or rare to capture.
It depends on your frame rate or FPS. If we assume 24 FPS. Which means 24 PHOTOS per second. We can multiply 24×10 and get 240. So 240 seconds or four minutes is the shortest possible time to get a 10-second time-lapse. But it could take longer if you’d like it. How long, is up to you.
I recommend 24fps. This is because it most closely mimics what our eyes see. But it depends on where you are. Some countries use PAL, in which case 25 FPS is preferred.
PAL is used mainly in Western Europe, as well as in China, India, Brazil, Argentina, Australia, New Zealand, and a number of African countries
This whole post answers the question. But the jist is to get a camera and allow it to run for at least an hour before and after sunrise or sunset.
The best settings will always depend on the scene in front of you and what you are trying to achieve. But typically it’s best if you can shoot in FULL MANUAL. Choose the proper Interval, the interval is the amount of time between each photo. If you have a 1 second interval, then you want your shutter speed to be as close to half your interval as possible. So a 1 second interval would get a half second shutter speed. 4 Second interval would get a 2 second shutter speed etc…
Then choose a nice white balance that matches the scene. Shoot at least 240 photos and you are good!
The easiest way to do it is outlined above, in aperture priority mode. This will have the camera do the heavy lifting and you can sit back and relax. For more hands-on approach you can do everything manually. Every time you notice your camera drop a full stop of light, adjust the settings back to proper exposure. Then level out those exposure jumps using software like LRTimelapse.